Making the Mashed Potato Base
If you’re starting with raw potatoes, peel and cube them into roughly equal pieces for even cooking. Place them in a large pot, cover with cold salted water, and bring to a boil. Reduce heat and simmer for 15-20 minutes until fork-tender.
Drain the potatoes thoroughly and return them to the hot pot for a minute to evaporate excess moisture. This step prevents watery mashed potatoes that won’t hold their shape. Mash the potatoes until smooth, then let them cool for about 10 minutes.
Once cooled slightly, mix in the melted butter, sour cream, both cheeses, eggs, garlic powder, and seasonings. The mixture should be thick enough to hold its shape when scooped but still creamy. If it seems too wet, add a tablespoon or two of flour.
Forming the Nests
Preheat your oven to 400°F and generously grease a muffin tin with butter or cooking spray. Don’t skip this step—properly greasing ensures your nests will release easily after baking.
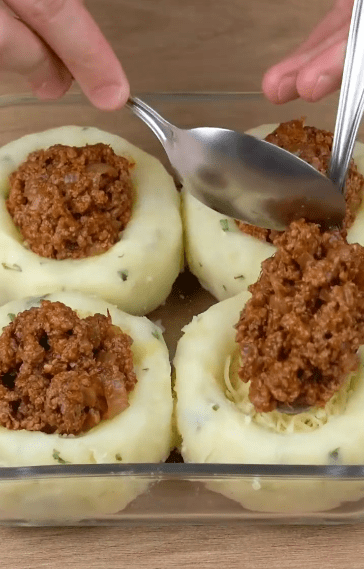
Scoop about 1/3 to 1/2 cup of the potato mixture into each muffin cup. Use the back of a spoon or your fingers (lightly greased) to press the mixture up the sides of each cup, creating a well in the center. Make sure the bottom isn’t too thin, or it might break when you remove the nests.
The walls should be about 1/4 inch thick all around. If they’re too thin, the nests might collapse; too thick, and they won’t get properly crispy.
Adding the Filling and Baking
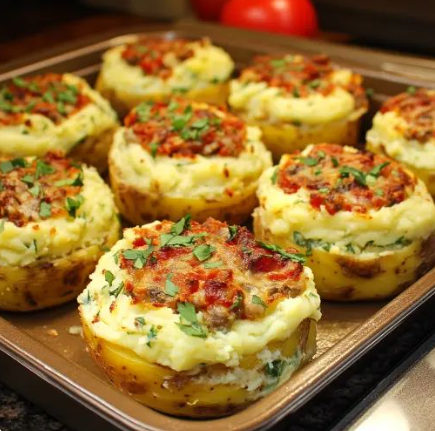
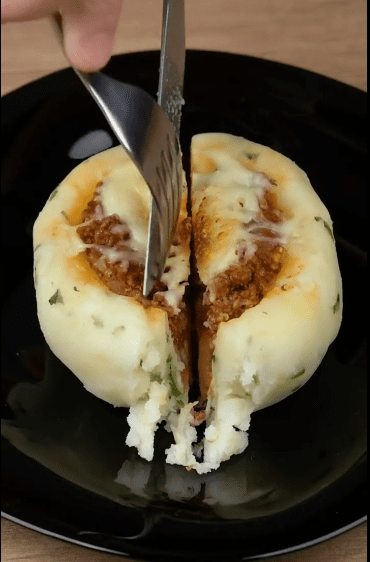
Fill each potato nest with your chosen filling. For the classic bacon and cheese version, layer a spoonful of crumbled bacon, then add shredded cheese and green onions. Don’t overfill—leave a little room at the top for the cheese to bubble without spilling over.
Bake for 20-25 minutes, until the edges are golden brown and crispy. If you want extra-crispy tops, brush the exposed potato edges with a little melted butter before baking.
Let the nests cool in the pan for about 5 minutes before attempting to remove them. Run a butter knife around the edges if needed, then use a spoon to gently lift each nest out. The brief cooling period allows the structure to firm up, making removal much easier.
Creative Filling Variations to Try
Breakfast-Style Nests
Transform these into a morning favorite by filling them with scrambled eggs, crumbled breakfast sausage, and shredded cheese. Top with a dollop of salsa and sour cream. These breakfast nests can be made ahead and reheated for busy mornings.
You can also create individual egg nests by cracking a raw egg into each potato cup during the last 10 minutes of baking. The result is a runny yolk surrounded by crispy potato—pure breakfast perfection.
Pizza-Inspired Nests
Kids and adults alike love these pizza-flavored versions. Fill the nests with marinara sauce, mozzarella cheese, and mini pepperoni slices. You can add Italian seasoning to the potato mixture for extra flavor. Serve with additional marinara for dipping.
Other pizza-style options include supreme (peppers, onions, sausage), Hawaiian (ham and pineapple), or white pizza (ricotta, mozzarella, and garlic).
Loaded Baked Potato Nests
Recreate the classic loaded baked potato in nest form. Fill with sour cream, bacon bits, shredded cheese, and chives. For extra indulgence, add a drizzle of ranch dressing or a dollop of butter.
This version tastes remarkably like a baked potato but with that irresistible crispy exterior that makes each bite more exciting.
International-Inspired Options
Get creative with global flavors. Try a Mexican-inspired version with seasoned ground beef, black beans, corn, cheese, and jalapeños. Top with guacamole and pico de gallo after baking.
For an Italian twist, fill nests with ricotta cheese mixed with spinach and sun-dried tomatoes, then top with mozzarella. A Greek version might include feta cheese, olives, tomatoes, and a sprinkle of oregano.
Tips for Perfect Results Every Time
Achieving the Ideal Texture
The secret to nests that are crispy outside and creamy inside lies in moisture control. Make sure your mashed potatoes aren’t too wet before forming the nests. If you’re using leftover mashed potatoes that seem watery, microwave them briefly to evaporate some moisture, then stir and let cool.
Adding an egg to the mixture helps bind everything together while contributing to that golden, crispy exterior. Don’t skip this ingredient even if you’re working with leftover mashed potatoes.
For extra-crispy edges, lightly brush the exposed potato with melted butter or spray with cooking oil before baking. Some cooks even broil the nests for the final 2-3 minutes, watching carefully to prevent burning.
Preventing Sticking Issues
Nothing is more frustrating than perfect-looking nests that fall apart when you try to remove them from the tin. Prevention starts with proper greasing—use butter, cooking spray, or even bacon grease for flavor.
Silicone muffin pans work exceptionally well for this recipe because the nests release easily without much effort. If using metal tins, consider using paper muffin liners for the easiest removal, though you’ll sacrifice some of the crispy exterior.
The cooling period before removal is essential. Five minutes gives the structure time to set without letting the nests become cold and stuck.
Making Ahead and Storing
Stuffed mashed potato nests are perfect make-ahead dishes. You can form the nests, cover the muffin tin with plastic wrap, and refrigerate for up to 24 hours before baking. Add a few extra minutes to the baking time if starting from cold.
For longer storage, bake the nests completely, let them cool, then freeze in a single layer on a baking sheet. Once frozen solid, transfer to freezer bags for up to 3 months. Reheat frozen nests in a 375°F oven for 20-25 minutes until heated through and crispy.
Leftover baked nests keep in the refrigerator for 3-4 days. Reheat in the oven or toaster oven rather than the microwave to maintain that desirable crispy texture.
Serving Suggestions and Presentation Ideas
Plating for Maximum Impact
These nests look impressive with minimal effort, but a few touches can take them to the next level. Serve on a white platter garnished with fresh herbs like parsley or chives. A light dusting of paprika adds color and a subtle flavor boost.
For individual plating, place each nest on a small bed of mixed greens or beside your main protein. A drizzle of sauce—whether it’s gravy, sour cream, or a flavored aioli—adds restaurant-quality polish.
Consider serving different varieties on the same platter for parties. Label each type with small cards so guests can choose their favorites. This creates an interactive element that people genuinely enjoy.
What to Serve Alongside
While stuffed mashed potato nests can certainly stand alone as a main course, they also work beautifully as a side dish. Pair them with roasted chicken, grilled steak, or baked fish for a complete meal.
For a lighter balance, serve alongside a crisp salad with vinaigrette or steamed vegetables like green beans or asparagus. The richness of the potato nests pairs nicely with fresh, acidic flavors.
During holidays, these nests can replace traditional mashed potatoes on your table, offering all the comfort of mashed potatoes with added visual appeal and individual portions that make serving easier.
Troubleshooting Common Problems
Nests That Won’t Hold Their Shape
If your potato mixture seems too soft to form proper nests, you have several options. Add a tablespoon or two of all-purpose flour to help bind the mixture. Alternatively, refrigerate the formed nests for 15-20 minutes before baking to help them firm up.
Make sure you’re pressing the mixture firmly into the muffin cups. Hesitant, gentle pressing often results in weak walls that collapse during baking.
Soggy Bottoms
Nobody wants a soggy-bottomed potato nest. This usually happens when there’s too much moisture in the filling or when the bottom layer of potato is too thin. Make sure your filling ingredients are well-drained, especially if using vegetables or anything with high water content.
Create a thicker base layer by pressing more potato mixture into the bottom of each cup. This creates a sturdy foundation that won’t become waterlogged.
Uneven Browning
If some nests brown much faster than others, your oven likely has hot spots. Rotate the muffin tin halfway through baking for more even results. Also, make sure you’re not overcrowding the oven—proper air circulation helps achieve consistent browning.
Using a light-colored metal or ceramic muffin tin generally produces more even results than dark metal, which can cause over-browning.
Why This Recipe Works for Any Occasion
Stuffed mashed potato nests succeed where many recipes fail—they’re genuinely simple to make yet look and taste like you spent hours in the kitchen. The basic technique is forgiving enough for beginners, while the endless variations keep experienced cooks interested.
For busy families, these nests can be assembled during meal prep sessions and baked throughout the week. For entertainers, they provide an elegant option that can be prepared ahead, leaving you free to enjoy your guests.
The individual portion aspect cannot be overstated. Everyone gets their own perfectly portioned nest, complete with crispy edges and creamy center. There’s no fighting over the crispy corner pieces because every nest has crispy parts.
Children especially love these because they feel special eating their own individual creation. Picky eaters can customize their fillings, making this an excellent way to encourage kids to try new ingredients.
The comfort food appeal of mashed potatoes combined with the excitement of a filled, crispy package creates something that satisfies on multiple levels. It’s familiar enough to feel comforting yet different enough to feel special—exactly what great food should do.
Once you master the basic technique, you’ll find yourself returning to this recipe again and again, experimenting with new fillings and adjustments that make it uniquely yours. That’s the mark of a truly great recipe—one that becomes a canvas for your own creativity while delivering reliably delicious results every single time.
