Removing Unnecessary Leaves
Once you’ve taken your cutting, immediately remove all but the top two or three leaves. Leaves transpire moisture, and too many will stress the cutting before it develops roots. The remaining leaves provide enough photosynthesis to keep the stem alive while minimizing water loss.
Cut any remaining leaves in half horizontally. This further reduces moisture loss while maintaining some photosynthetic capacity. It might look strange, but this technique significantly improves rooting success.
Removing Thorns and Flower Buds
Strip away any thorns from the portion of stem that will be submerged in water. Thorns can harbor bacteria that contaminate the water. Remove them carefully by pressing sideways with your thumb rather than pulling, which can damage the stem tissue.
If there are any flower buds or developing blooms on your cutting, remove these as well. Flower production requires tremendous energy that should instead be directed toward root development.
Optional Rooting Hormone Application
While not strictly necessary for water propagation, applying rooting hormone to the cut end can increase success rates and speed root development. Dip the bottom inch of your prepared cutting into rooting hormone powder, tapping off any excess.
If you don’t have commercial rooting hormone, you can make a natural alternative using willow water. Steep young willow twigs in water overnight—willows contain natural rooting hormones that will transfer to the water. Use this willow water for your rose cuttings.
Setting Up Your Water Propagation System
Choosing the Right Container
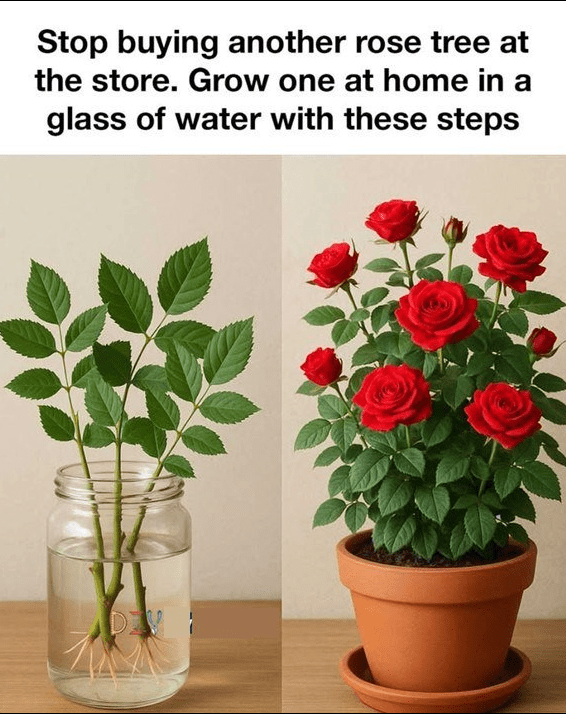
Select a clear glass container that allows you to monitor root development. I prefer tall drinking glasses or mason jars that provide stability and prevent cuttings from falling over. The container should be clean and free from any soap residue, which can harm delicate developing roots.
Dark-colored containers work too, but clear glass lets you watch the exciting process of root formation. There’s something deeply satisfying about seeing those first white root tips emerge from the stem.
Water Quality Matters
Use room-temperature filtered or distilled water rather than tap water. Tap water often contains chlorine, fluoride, and other chemicals that can inhibit root development. If you must use tap water, let it sit uncovered for 24 hours to allow chlorine to dissipate.
Fill your container so that two to three inches of the cutting’s stem will be submerged. The water level should cover at least one or two leaf nodes but shouldn’t reach the remaining leaves. Leaves that touch water will rot and contaminate the entire container.
Creating the Ideal Environment
Place your container in a location that receives bright, indirect light. Direct sunlight is too intense and will heat the water, potentially cooking your cuttings. A north-facing window or a spot a few feet from an east or west window works perfectly.
The ideal temperature range for root development is 65-75°F. Avoid placing containers near heating or cooling vents, which create temperature fluctuations that stress the cuttings.
Daily Care and Maintenance
Water Changes and Monitoring
Change the water every three to four days to prevent bacterial growth and ensure adequate oxygen levels. When changing water, rinse the container thoroughly and check the cut end of each stem for any signs of rot or decay.
If you notice the water becoming cloudy before the scheduled change, replace it immediately. Cloudy water indicates bacterial growth that can damage or kill your cuttings.
Watching for Root Development
Most rose cuttings begin showing root development within two to four weeks, though some varieties take longer. You’ll first see small white bumps forming at the nodes, followed by tiny root tips emerging. These roots initially appear almost transparent before developing into thicker, more substantial structures.
Be patient during this phase. Some cuttings root quickly while others take their time. As long as the stem remains green and firm with no signs of rot, keep waiting.
Identifying and Addressing Problems
If you notice the stem turning black or brown and becoming soft, that section is rotting. Remove the cutting from water, cut away the rotted portion until you reach healthy green tissue, and place it back in fresh water. Sometimes you can save a cutting this way, though success isn’t guaranteed.
Leaves turning completely yellow and dropping off isn’t necessarily a problem—the cutting may be conserving energy. However, if the stem itself starts yellowing or the remaining leaves develop black spots, the cutting likely won’t survive.
Transitioning Rooted Cuttings to Soil
When Roots Are Ready
Your cutting is ready for planting when roots are two to three inches long and you can see multiple roots developing from different points on the stem. Rushing this step by planting too early reduces survival rates, but waiting too long creates fragile roots that damage easily during transplanting.
I typically wait until I see at least five to seven healthy roots, each measuring at least two inches. At this stage, the root system is robust enough to support the plant while it adjusts to soil.
Preparing the Planting Medium
Use a light, well-draining potting mix specifically formulated for roses or general purpose potting soil mixed with perlite or coarse sand. Avoid using garden soil, which may contain pathogens and typically doesn’t drain well enough for newly rooted cuttings.
Fill a small pot with drainage holes about two-thirds full with your soil mixture. Water the soil until it’s evenly moist but not soggy—think of a wrung-out sponge.
The Transplanting Process
Make a hole in the center of your prepared pot using your finger or a pencil. The hole should be deep enough to accommodate all the roots without bending or crowding them.
Carefully remove the cutting from water, supporting the delicate roots. Gently lower the roots into the prepared hole, spreading them out naturally. Fill in around the roots with soil, firming gently but not compacting.
Water thoroughly after planting to settle the soil around the roots and eliminate air pockets. Place the newly potted cutting in the same bright, indirect light location where it rooted.
Hardening Off Your New Rose Plant
Gradual Acclimation
Your water-rooted rose cutting has lived in a protected environment without wind, temperature fluctuations, or intense light. It needs gradual acclimation before moving to its permanent garden location.
Start by placing the potted cutting outside in a sheltered, shady spot for just an hour or two. Over the next two weeks, gradually increase both the time outside and the amount of direct sunlight exposure.
Monitoring During Transition
Watch carefully for signs of stress during hardening off. Wilting leaves, sunburn (brown, crispy patches on leaves), or sudden leaf drop indicate you’re moving too quickly. Pull back slightly and give the plant more time at each stage.
Keep the soil consistently moist during this transition period. The plant is working hard to adjust to new conditions and needs adequate moisture to avoid additional stress.
Permanent Planting
Once your rose has successfully acclimated to outdoor conditions—usually after two to three weeks—you can transplant it to its permanent location. Choose a spot with at least six hours of direct sunlight and well-draining soil enriched with compost.
Dig a hole twice as wide as the pot and just as deep. Remove the plant from its pot, keeping the root ball intact, and place it in the hole at the same depth it was growing in the container. Backfill with amended soil, water deeply, and mulch around the base to retain moisture.
Troubleshooting Common Problems
Cuttings That Won’t Root
If weeks pass with no root development, don’t give up immediately. Some rose varieties naturally root more slowly than others. Hybrid teas, for example, often take longer than floribundas or old garden roses.
Try refreshing your approach by taking a thin slice off the bottom of the stem to expose fresh tissue, then placing it back in fresh water. This can sometimes jumpstart reluctant cuttings.
Fungal or Bacterial Issues
If you notice fuzzy growth on the stem or in the water, you’re dealing with fungal or bacterial contamination. Remove the cutting, discard the water, and sterilize the container thoroughly with a diluted bleach solution.
Trim away any affected stem tissue, treat with a fungicide if available, and place the cutting in fresh water. Adding a tiny piece of charcoal to the water can help prevent future bacterial growth.
Leaf Drop and Yellowing
Some leaf yellowing and drop is normal as the cutting redirects energy toward root production. However, if all leaves drop or turn yellow simultaneously, the cutting may be under too much stress.
Ensure you’re providing the right light levels, changing water regularly, and maintaining appropriate temperatures. Sometimes reducing the remaining leaves by half again can help stressed cuttings survive.
Best Rose Varieties for Water Propagation
Easy-to-Root Varieties
Some roses root far more readily than others in water. Climbing roses, ramblers, and most old garden roses propagate easily with high success rates. Miniature roses also root reliably in water.
Shrub roses and landscape roses typically root well, making them excellent choices for beginners. These hardy varieties tolerate the stress of propagation better than more delicate types.
More Challenging Varieties
Hybrid tea roses can be propagated in water but generally have lower success rates and take longer to root. They’re more sensitive to conditions and require more patience.
Grafted roses present a special consideration. When you propagate from a grafted rose, you’re rooting the scion variety (the flowering part), not the rootstock. The resulting plant may perform differently than the parent plant, potentially lacking the vigor the rootstock provided.
The Economics of Growing Your Own Roses
Cost Comparison
A mature rose bush at a nursery typically costs fifteen to thirty dollars, with rare or specialty varieties reaching fifty dollars or more. By contrast, propagating roses at home costs virtually nothing beyond the time invested.
From a single established rose bush, you can take multiple cuttings each year, potentially growing dozens of new plants. This allows you to create stunning rose hedges, fill large garden beds, or share plants with friends without significant financial investment.
Environmental Benefits
Stop buying another rose tree at the store and you also reduce the environmental impact associated with commercial rose production, packaging, and transportation. Home propagation creates zero waste and requires no plastic pots or transport fuel.
Additionally, propagating from local roses that thrive in your specific climate often produces hardier plants than nursery stock shipped from distant growing regions.
Creating a Propagation Station
Multiple Cuttings Strategy
Rather than rooting just one or two cuttings, I recommend starting with at least six to eight from different stems or even different rose bushes if available. This numbers game accounts for the reality that not every cutting will successfully root.
Group multiple cuttings in the same container if it’s large enough, or use several containers. Just ensure each cutting has adequate space and isn’t crowded against others, which can promote fungal issues.
Record Keeping
Label each container with the rose variety and the date you started the cutting. This information helps you track which varieties root most successfully and how long the process typically takes for each type.
I keep a simple garden journal noting cutting dates, rooting times, and success rates. Over time, this information reveals patterns that help improve your technique and guide variety selection.
Seasonal Considerations
Spring Propagation
Spring cuttings taken from new growth tend to root quickly due to high hormone levels and vigorous plant growth. However, these softwood cuttings are more delicate and require careful attention to prevent wilting.
Summer Timing
Early to mid-summer provides semi-hardwood cuttings that balance the vigor of spring growth with the stability of more mature wood. This is my preferred timing for water propagation with the highest overall success rates.
Fall and Winter Challenges
While possible, propagating roses in fall and winter presents challenges. Growth slows dramatically, roots develop much more slowly, and success rates drop. If you do propagate during cooler months, expect the process to take twice as long as summer propagation.
Sharing Your Success
Gifting Rooted Roses
Once you’ve mastered water propagation, you’ll find yourself with more rose plants than you can use. These make wonderful gifts for gardening friends and family. Present them in attractive pots with care instructions, and you’ve created a living gift that appreciates in value over time.
Building a Cutting Exchange
Connect with other gardeners in your area to establish a cutting exchange. You provide cuttings from your roses, they share cuttings from theirs, and everyone expands their rose collection with new varieties at zero cost.
Local gardening groups, community gardens, and social media gardening communities often facilitate these exchanges, creating connections while building beautiful gardens.
The Deeper Satisfaction
Stop buying another rose tree at the store, and you tap into something more valuable than money saved or plants gained. There’s profound satisfaction in understanding how plants work, in successfully coaxing roots from a simple stem cutting, and in watching a tiny cutting grow into a mature, blooming rose bush.
This process connects you more deeply with your garden. These aren’t just roses you bought—they’re plants you created, each one representing your growing skill and understanding. When they bloom for the first time, that satisfaction runs deeper than any store-bought plant could provide.
The techniques I’ve shared aren’t complicated or require special skills. They simply require patience, attention, and a willingness to experiment. Your first attempts might not all succeed, but each one teaches you something. By your third or fourth round of propagation, you’ll have developed an intuitive sense of what works.
Start this weekend. Look at your roses or a neighbor’s beautiful bush (with permission), take a few cuttings, and place them in water. Check on them daily, change the water regularly, and watch for those first exciting signs of root development. Before you know it, you’ll wonder why you ever bought roses at the store when growing them yourself is so remarkably simple and infinitely more rewarding.
