Your New Favorite Dessert Obsession
Picture this: a dessert so visually stunning that everyone at your dinner table stops mid-conversation to admire it. That’s exactly what happens when you serve a Mosaic Velvet Oreo Cheesecake. This no-bake wonder combines the beloved crunch of Oreo cookies with the silky smoothness of cream cheese, creating a dessert that’s not just delicious—it’s absolutely unforgettable.
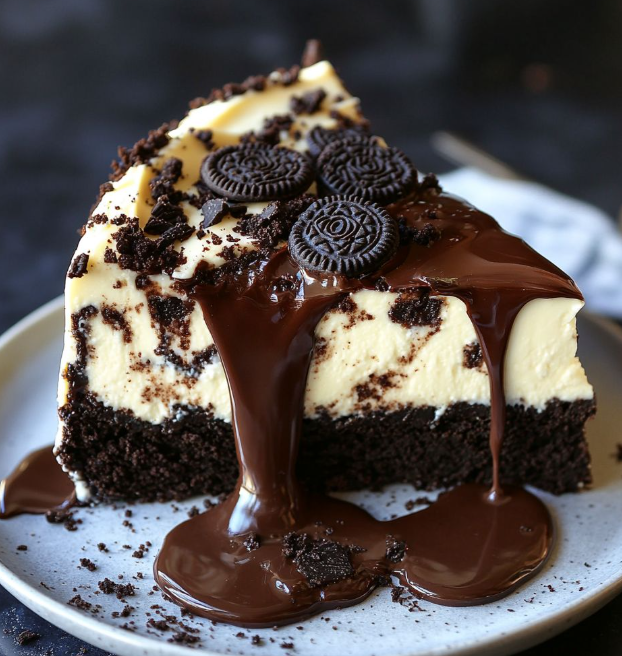
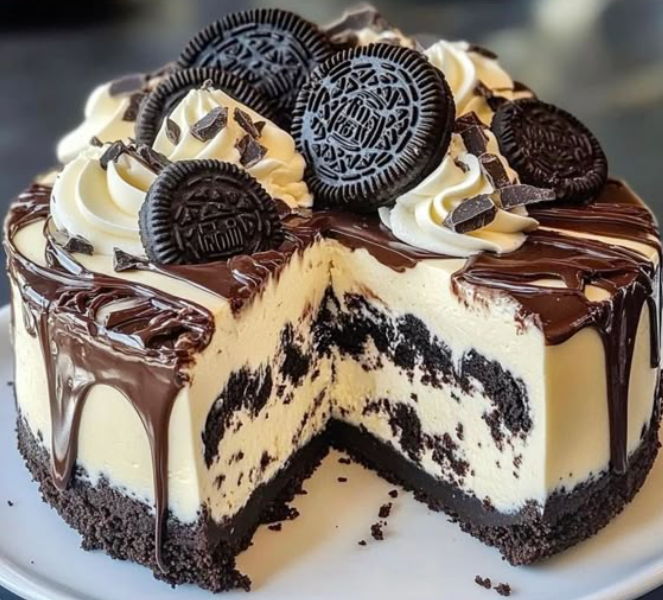
The beauty of this Mosaic Velvet Oreo Cheesecake recipe lies in its gorgeous mosaic pattern created by the crushed Oreos suspended throughout the velvety cheesecake base. When you slice into it, you’ll reveal a beautiful cross-section that looks like edible art. This dessert originated from the creative fusion of traditional cheesecake recipes with the no-bake refrigerator cake trend that swept through home kitchens in recent years.
What makes this recipe truly special is how it transforms simple, everyday ingredients into something extraordinary. The “velvet” in its name isn’t just for show—the texture is genuinely smooth and luxurious, melting on your tongue with each bite. The Oreos add not only flavor but also that satisfying textural contrast that keeps you coming back for more.
This recipe is perfect for busy home cooks, dessert enthusiasts, and anyone who wants to impress without spending hours in the kitchen. Whether you’re preparing for a special celebration, a weekend family gathering, or simply treating yourself after a long week, this Mosaic Velvet Oreo Cheesecake delivers maximum impact with minimal stress. Plus, since it’s completely no-bake, you won’t have to worry about oven temperatures or baking times—your refrigerator does all the work!
Table of Contents
Ingredients You’ll Need for Mosaic Velvet Oreo Cheesecake
For the Oreo Base:
- 24 Oreo cookies (about 250g), divided
- 5 tablespoons unsalted butter, melted
- 2 tablespoons granulated sugar
For the Velvet Cheesecake Filling:
- 500g cream cheese, softened to room temperature
- 1 cup (240ml) heavy whipping cream, cold
- ¾ cup (150g) powdered sugar
- 2 teaspoons pure vanilla extract
- 2 tablespoons fresh lemon juice
- 1 packet (7g) unflavored gelatin
- 3 tablespoons cold water
- 12 Oreo cookies, roughly crushed for the mosaic effect
For the Topping:
- 1 cup (240ml) heavy whipping cream
- 3 tablespoons powdered sugar
- 6-8 Oreo cookies, whole or halved for decoration
- Chocolate shavings (optional)
Substitution Notes: You can use reduced-fat cream cheese if you prefer a lighter version, though the texture will be slightly less rich. For a dairy-free alternative, coconut cream can replace heavy cream, and vegan cream cheese works wonderfully. If you can’t find unflavored gelatin, agar-agar powder is an excellent halal-certified substitute—use 1 teaspoon agar-agar powder in place of the gelatin packet.
Step-by-Step Instructions for Perfect Mosaic Velvet Oreo Cheesecake
Step 1: Prepare Your Pan
Start by lining a 9-inch springform pan with parchment paper on the bottom. You can also lightly grease the sides with butter to ensure easy release later. This preparation step is crucial for getting clean, beautiful slices when you’re ready to serve your masterpiece.
Step 2: Create the Crunchy Base
Take 18 of your Oreo cookies (including the cream filling) and pulse them in a food processor until they form fine crumbs. If you don’t have a food processor, place the cookies in a sealed plastic bag and crush them with a rolling pin—it’s actually quite therapeutic! Mix these crumbs with the melted butter and sugar until the mixture resembles wet sand. Press this mixture firmly and evenly into the bottom of your prepared pan. Use the back of a measuring cup to really compact it down. Pop the base into the refrigerator while you prepare the filling.
Step 3: Bloom the Gelatin
In a small bowl, sprinkle the unflavored gelatin over the cold water and let it sit for about 5 minutes. You’ll notice it becomes thick and spongy—this is called “blooming.” After blooming, gently heat the mixture in the microwave for 10-15 seconds or over a double boiler until it becomes completely liquid and clear. Set it aside to cool slightly but don’t let it set again.
Step 4: Whip Up the Velvet Base
In a large mixing bowl, beat the softened cream cheese with an electric mixer on medium speed until it’s completely smooth and fluffy, about 2-3 minutes. You want absolutely no lumps here—this is what gives your cheesecake that signature velvet texture. Add the powdered sugar, vanilla extract, and lemon juice, then beat again until everything is beautifully combined. The lemon juice might seem unusual, but it brightens the flavor and cuts through the richness perfectly.
Step 5: Add the Gelatin Magic
While your mixer is running on low speed, slowly drizzle in the cooled (but still liquid) gelatin mixture. Make sure it incorporates evenly throughout the cream cheese mixture. This gelatin is what will give your cheesecake structure without baking, allowing it to hold its shape when sliced.
Step 6: Whip the Cream to Perfection
In a separate cold bowl (I like to chill mine in the freezer for 10 minutes first), whip the cold heavy cream until stiff peaks form. This should take about 3-4 minutes with an electric mixer. You’ll know it’s ready when the cream holds its shape and doesn’t slide around the bowl when you tilt it.
Step 7: Fold and Create the Mosaic
Gently fold half of the whipped cream into the cream cheese mixture using a rubber spatula. Use a folding motion rather than stirring to keep the mixture light and airy. Once that’s combined, fold in the remaining whipped cream. Now comes the fun part—gently fold in your roughly crushed Oreos. These chunks will create that stunning mosaic pattern when you slice the cake. Don’t overmix here; you want visible pieces of Oreo throughout.
Step 8: Assemble Your Masterpiece
Pour the velvet cheesecake mixture over your chilled Oreo base. Use a spatula to spread it evenly and smooth the top. Tap the pan gently on the counter a few times to release any air bubbles. Cover the pan with plastic wrap and refrigerate for at least 6 hours, but overnight is even better. This chilling time is non-negotiable—it’s what transforms your mixture into a sliceable, dreamy cheesecake.
Step 9: Create the Crowning Glory
About 30 minutes before serving, whip together the topping ingredients until soft peaks form. Spread or pipe this cream over your set cheesecake. Decorate with whole or halved Oreos, and if you’re feeling fancy, add some chocolate shavings or a drizzle of chocolate sauce.
Step 10: Slice and Serve
Run a thin knife under hot water, dry it, and then slice your Mosaic Velvet Oreo Cheesecake. Clean the knife between cuts for the prettiest slices. Watch as everyone marvels at the beautiful mosaic pattern you’ve created!
Pro Tips & Variations for Your Mosaic Velvet Oreo Cheesecake
Temperature Matters: Always ensure your cream cheese is at true room temperature before starting. Cold cream cheese creates lumps that are nearly impossible to smooth out, no matter how long you beat it. Take it out of the refrigerator at least 2 hours before you plan to start baking.
Cookie Crushing Strategy: For the mosaic effect, aim for varied sizes when crushing your Oreos—some larger chunks and some smaller pieces create the most visually interesting pattern. Don’t pulverize them into dust; you want recognizable cookie pieces.
Flavor Variations: Try using different Oreo flavors like mint, peanut butter, or red velvet for a unique twist. Golden Oreos create a completely different visual aesthetic with a lovely vanilla flavor profile.
Chocolate Lover’s Version: Add 3 tablespoons of cocoa powder to your cream cheese mixture for an even more intense chocolate experience. You can also mix in some chocolate chips along with the crushed Oreos.
Lighter Option: Replace half the cream cheese with Greek yogurt for a tangier, lighter cheesecake that still maintains that velvety texture. You can also use light cream cheese and reduce the sugar by a quarter cup if you prefer less sweetness.
Berry Swirl Addition: Before refrigerating, drop spoonfuls of berry jam (strawberry or raspberry work beautifully) onto the top of your cheesecake and swirl it gently with a knife for a fruity twist.
Individual Servings: Instead of using a springform pan, divide the mixture among 8-10 small glasses or mason jars for adorable individual portions. These are perfect for parties and eliminate the need for slicing.
Storage & Reheating Tips
Refrigerator Storage: Your Mosaic Velvet Oreo Cheesecake will stay fresh in the refrigerator for up to 5 days when properly stored. Cover it tightly with plastic wrap or aluminum foil, or keep it in its springform pan with a cover. The cheesecake actually tastes even better after the second day as the flavors meld together beautifully.
Freezing Instructions: This cheesecake freezes exceptionally well! Wrap individual slices tightly in plastic wrap, then again in aluminum foil, and store in an airtight container for up to 3 months. When you’re ready to enjoy, transfer slices to the refrigerator and let them thaw overnight. The texture remains remarkably creamy and delicious.
Serving Temperature: For the best texture and flavor, remove your cheesecake from the refrigerator about 15-20 minutes before serving. This slight warming allows the flavors to bloom and the texture to become even more velvety on your palate.
Topping Tips: If you’ve already added the whipped cream topping, the cheesecake is best consumed within 2-3 days as the cream may start to weep. For longer storage, keep the cheesecake plain and add fresh whipped cream topping just before serving.
Frequently Asked Questions About Mosaic Velvet Oreo Cheesecake
Can I Make This Mosaic Velvet Oreo Cheesecake Ahead of Time?
Absolutely! In fact, this is one of the best make-ahead desserts you can prepare. The Mosaic Velvet Oreo Cheesecake needs at least 6 hours to set properly, so making it the night before your event is actually ideal. You can prepare it up to 2 days in advance—just wait to add the whipped cream topping until the day you’re serving it for the freshest presentation.
Why Is My Cheesecake Not Setting Properly?
If your cheesecake remains too soft after the recommended chilling time, there are a few possible culprits. First, make sure you used the correct amount of gelatin and that it was properly bloomed and dissolved. Second, check that you folded (not stirred) the ingredients together to maintain the airiness. If it’s still soft, give it a few more hours in the fridge. The gelatin needs adequate time to work its magic, and sometimes refrigerators at different temperatures require different setting times.
Can I Use Store-Bought Whipped Topping Instead of Heavy Cream?
Yes, you can substitute store-bought whipped topping (like Cool Whip) in this Mosaic Velvet Oreo Cheesecake recipe, but be aware that it will change the texture slightly. Store-bought options tend to be sweeter and have a different mouthfeel than freshly whipped cream. If you do use it, you’ll need about 2 cups of prepared whipped topping for the filling. However, I strongly recommend using real heavy cream for the most luxurious, velvety texture.
Can I Make This Recipe Without Gelatin?
Yes! If you prefer to skip the gelatin or need a vegetarian alternative, you can use agar-agar powder (1 teaspoon dissolved in the same amount of water) or add an extra 8 oz of cream cheese to help the filling set. Another option is to increase the chilling time to 8-10 hours, which allows the mixture to firm up naturally from the cold temperature alone, though the texture will be slightly softer.
What Can I Do If My Oreo Base Is Too Crumbly?
If your base feels too dry and crumbly, you likely need a bit more melted butter. The mixture should stick together when pressed—think of it like wet sand that holds its shape. Add an extra tablespoon of melted butter if needed. Also, make sure you’re pressing the base down very firmly into the pan. Use the bottom of a glass or measuring cup to really compact it, which helps it hold together when you slice the cheesecake.
Nutritional Information
Per Serving (based on 12 servings):
- Calories: 385
- Total Fat: 27g
- Saturated Fat: 15g
- Cholesterol: 68mg
- Sodium: 245mg
- Total Carbohydrates: 34g
- Dietary Fiber: 1g
- Sugars: 24g
- Protein: 5g
Please note: These are approximate values and may vary based on specific brands and ingredients used. If you’re using substitutions like reduced-fat cream cheese or alternative sweeteners, your nutritional values will differ.
Recipe Card: Mosaic Velvet Oreo Cheesecake
Recipe Title: No-Bake Mosaic Velvet Oreo Cheesecake
Prep Time: 30 minutes
Chill Time: 6 hours (or overnight)
Total Time: 6 hours 30 minutes
Servings: 12 slices
Ingredients:
Oreo Base:
- 18 Oreo cookies, crushed into fine crumbs
- 5 tablespoons unsalted butter, melted
- 2 tablespoons granulated sugar
Velvet Filling:
- 500g cream cheese, softened
- 1 cup heavy whipping cream, cold
- ¾ cup powdered sugar
- 2 teaspoons vanilla extract
- 2 tablespoons fresh lemon juice
- 1 packet (7g) unflavored gelatin
- 3 tablespoons cold water
- 12 Oreo cookies, roughly crushed
Topping:
- 1 cup heavy whipping cream
- 3 tablespoons powdered sugar
- 6-8 Oreos for decoration
Instructions:
- Line a 9-inch springform pan with parchment paper and lightly grease the sides.
- Mix crushed Oreos with melted butter and sugar, press firmly into pan bottom, and refrigerate.
- Bloom gelatin in cold water for 5 minutes, then heat until liquid and clear.
- Beat cream cheese until fluffy, add powdered sugar, vanilla, and lemon juice.
- Drizzle in dissolved gelatin while mixing on low speed.
- Whip heavy cream to stiff peaks in a separate bowl.
- Fold whipped cream into cream cheese mixture in two additions.
- Gently fold in crushed Oreos for the mosaic effect.
- Pour over chilled base, smooth top, cover, and refrigerate for at least 6 hours or overnight.
- Before serving, whip topping ingredients and decorate with Oreos.
Notes:
- Cream cheese must be at room temperature for smooth mixing
- Don’t skip the gelatin—it’s essential for structure
- Vary Oreo chunk sizes for the best mosaic pattern
- Can be made up to 2 days in advance
- Freezes beautifully for up to 3 months
We’d Love to Hear From You!
Have you tried this Mosaic Velvet Oreo Cheesecake recipe? We’re absolutely dying to know how it turned out! Did you add your own creative twist? Maybe you used a different Oreo flavor or added a fun topping? Drop a comment below and share your experience with our community of dessert lovers. And if this recipe made you the star of your dinner party (we know it did!), please share it with your friends and family on social media. There’s nothing better than spreading the joy of homemade desserts. Don’t forget to tag us in your beautiful cheesecake photos—we love seeing your creations come to life! Happy baking, and may your slices always reveal that perfect mosaic pattern! 🍰
