Milk brioche rolls are the ultimate comfort bread—pillowy soft, subtly sweet, and enriched with butter that creates a tender crumb unlike any ordinary dinner roll. These soft and fluffy bread easy recipes you’ll love transform simple ingredients into golden, glossy rolls that practically melt in your mouth. Whether you’re planning a holiday feast, Sunday brunch, or just craving fresh-baked bread, mastering milk brioche rolls opens up a world of baking possibilities.
The beauty of brioche lies in its versatility. These rolls work equally well alongside savory dishes or transformed into sweet breakfast treats. The high butter and milk content creates a rich flavor that’s distinctive yet never overwhelming, making them the perfect canvas for whatever you’re serving.
Table of Contents
Why Milk Brioche Rolls Stand Apart from Regular Bread
Brioche occupies a special place between bread and pastry. The generous amounts of butter, eggs, and milk create a texture that’s closer to cake than crusty artisan bread, yet the yeast and kneading technique firmly root it in bread-making tradition.
Unlike lean breads made with just flour, water, yeast, and salt, brioche is an enriched dough. This means it contains ingredients that tenderize and enrich—butter softens the crumb, eggs add structure and color, milk contributes moisture and subtle sweetness, and sugar feeds the yeast while enhancing browning.
The result is a roll that stays fresh longer than regular bread, tears apart in soft layers rather than crumbling, and has a slightly sweet flavor that complements both butter and jam as easily as it does roasted meats and gravies.
Essential Ingredients for Perfect Milk Brioche Rolls
Flour: Building the Foundation
All-purpose flour works perfectly for milk brioche rolls, creating a tender structure without being too delicate. Bread flour will give you slightly more chew if you prefer, but all-purpose strikes the ideal balance between softness and structure.
Measure your flour correctly by spooning it into your measuring cup and leveling it off. Scooping directly from the bag compacts the flour, giving you more than the recipe intends and resulting in dry, heavy rolls.
Milk: The Secret to Softness
Whole milk creates the richest, softest brioche. The fat content contributes to tenderness while the milk proteins help the dough develop a fine, even crumb. You can use 2% milk in a pinch, but avoid skim milk—you’ll lose the richness that makes brioche special.
Warm your milk to between 100-110°F before adding it to the dough. Too hot will kill your yeast, too cold will slow down fermentation dramatically. It should feel warm but not hot when you test it on your wrist.
Butter: The Heart of Brioche
European-style butter with higher fat content creates the most luxurious brioche, but regular unsalted butter works beautifully too. The butter must be at room temperature—soft enough to blend easily but not melted. Melted butter changes the dough structure, preventing proper development.
Plan to use at least six tablespoons of butter for a standard batch of rolls. This might seem excessive compared to regular bread, but it’s what creates that characteristic brioche texture and flavor.
Eggs: Structure and Color
Eggs provide structure, moisture, and that gorgeous golden color. Room temperature eggs incorporate more easily into the dough than cold ones. If you forget to take them out ahead, place them in a bowl of warm water for five minutes.
Yeast: Choosing the Right Type
Active dry yeast and instant yeast both work for brioche. Instant yeast can be mixed directly into the flour, while active dry yeast should be dissolved in the warm milk first. I prefer instant yeast for its reliability and convenience, but use whichever you have on hand.
Fresh yeast creates excellent brioche too, though it’s harder to find. Use about three times the weight of fresh yeast as you would dry yeast.
Step-by-Step Guide to Making Milk Brioche Rolls
Ingredients for 12 Rolls
- 3¾ cups all-purpose flour
- ⅓ cup granulated sugar
- 2¼ teaspoons instant yeast
- 1 teaspoon salt
- ¾ cup whole milk, warmed
- 3 large eggs, room temperature
- 6 tablespoons unsalted butter, softened
- 1 egg yolk mixed with 1 tablespoon milk for brushing
Mixing the Dough
In the bowl of a stand mixer fitted with the dough hook, combine the flour, sugar, yeast, and salt. Mix briefly to distribute the ingredients evenly.
In a separate bowl, whisk together the warm milk and eggs until combined. With the mixer on low speed, slowly pour the milk mixture into the flour. Mix until a shaggy dough forms, about two minutes.
Increase the speed to medium-low and knead for five minutes. The dough will be quite sticky at this point—resist the urge to add more flour. This stickiness is normal for enriched doughs.
Incorporating the Butter
With the mixer running on low, add the softened butter one tablespoon at a time, waiting until each addition is fully incorporated before adding the next. This gradual addition helps the butter emulsify into the dough rather than coating the outside.
Once all the butter is added, increase the speed to medium and knead for eight to ten minutes. The dough should become smooth, elastic, and slightly sticky. It should pull away from the sides of the bowl but still stick slightly to the bottom.
If your dough seems excessively sticky after the full kneading time, you can add one to two tablespoons of flour, but add conservatively. Brioche dough is naturally softer and stickier than regular bread dough.
The First Rise
Transfer the dough to a lightly greased bowl, turning once to coat all sides. Cover tightly with plastic wrap and let it rise in a warm, draft-free spot until doubled in size, about one to two hours.
For even better flavor, you can refrigerate the dough overnight after this first rise. The cold fermentation develops more complex flavors and makes the dough easier to shape. Let it come to room temperature before shaping, which takes about 30 minutes.
Shaping Your Milk Brioche Rolls
Dividing the Dough
Once your dough has doubled, punch it down gently to release the gases. Turn it out onto a lightly floured surface and divide it into 12 equal pieces. A kitchen scale ensures uniform sizing—each piece should weigh about 75 grams.
Creating Perfectly Round Rolls
To shape each roll, cup your hand over a piece of dough and move your hand in a circular motion against the counter. The dough should roll between your palm and the work surface, creating surface tension that pulls the dough into a smooth ball.
The key is using just enough pressure to create tension without flattening the dough. If the dough slides around instead of rolling, your surface might be too floured—wipe it with a damp cloth to add slight tackiness.
Arranging for Rising
Place your shaped rolls on a parchment-lined baking sheet, spacing them about two inches apart. For pull-apart style rolls, place them closer together—about one inch apart—so they bake into each other.
Cover the rolls loosely with greased plastic wrap or a damp kitchen towel. The covering prevents the surface from drying out and forming a skin that would inhibit rising and create a tough crust.
The Second Rise and Baking Process
Proofing Until Puffy
Let the shaped rolls rise until they’re puffy and nearly doubled in size, about 45 to 60 minutes. They should look pillowy and jiggle slightly when the pan is gently shaken.
Press a floured finger gently into a roll—if the indent springs back slowly and incompletely, they’re ready to bake. If it springs back immediately, give them more time. If it doesn’t spring back at all, they’re slightly overproofed but will still bake fine.
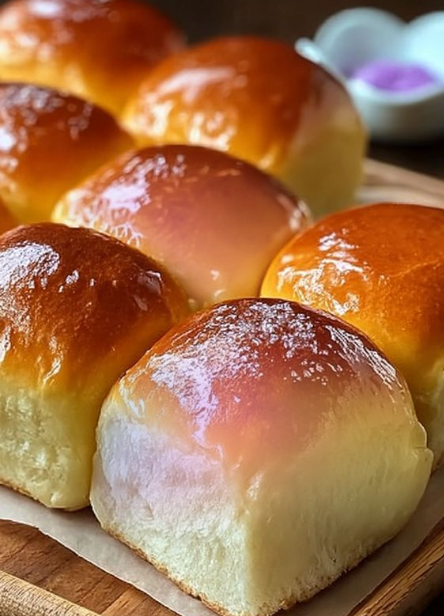
The Egg Wash Technique
About 15 minutes before baking, preheat your oven to 375°F. Just before the rolls go in, brush them gently with the egg wash mixture. Use a soft pastry brush and light strokes—pressing too hard can deflate your carefully proofed rolls.
The egg wash creates that characteristic glossy, golden-brown crust that makes brioche so visually appealing. For an even shinier finish, apply a second coat of egg wash halfway through baking.
Baking to Golden Perfection
Bake the rolls for 18 to 22 minutes, until they’re deeply golden brown on top. They should sound hollow when tapped on the bottom, and an instant-read thermometer inserted into the center should register 190°F.
If the tops are browning too quickly but the rolls aren’t done, tent them loosely with aluminum foil for the remaining baking time. This protects the surface while the interior finishes cooking.
Transfer the baked rolls to a wire rack immediately. Brush them with melted butter while still hot if you want an even softer, richer crust. This step is optional but delicious.
Troubleshooting Common Brioche Problems
Dense or Heavy Rolls
If your rolls turn out dense, several factors might be at fault. Insufficient kneading prevents proper gluten development, which is essential even in enriched doughs. The dough should pass the windowpane test—when stretched gently, a small piece should form a thin, translucent membrane without tearing.
Old or inactive yeast is another common culprit. Test your yeast by dissolving a teaspoon in warm water with a pinch of sugar—it should foam vigorously within ten minutes.
Underproofing creates dense rolls too. They need adequate time to rise, and rushing this process results in tight, heavy bread. Conversely, overproofing can cause the structure to collapse, also creating density. Find the sweet spot where they’re puffy but still springy.
Butter Leaking During Baking
If butter pools around your rolls in the oven, the butter wasn’t properly incorporated into the dough. This usually happens when the butter is too cold or added too quickly. Make sure your butter is truly soft—it should leave an indentation when pressed but not be greasy or shiny.
Using melted butter instead of softened butter can cause leaking too. The recipe specifically calls for softened butter because its consistency allows proper emulsification with the dough.
Rolls That Spread Instead of Rising Up
Spreading rolls indicate the dough is too soft or warm. If your kitchen is very hot, the butter can soften too much, causing the dough to spread rather than hold its shape. Try shaping the rolls, then refrigerating them for 15 minutes before the final proof.
Insufficient shaping tension can cause spreading too. When forming each roll, you’re creating a tight outer skin that helps the roll maintain its shape and rise upward rather than outward.
Creative Variations on Classic Milk Brioche Rolls
Cinnamon Sugar Twist
After shaping each roll, roll it in melted butter, then in a mixture of cinnamon and sugar before placing it in the pan. The rolls bake together into a pull-apart treat that’s perfect for breakfast or brunch.
Herb and Garlic Savory Rolls
Knead minced fresh herbs and roasted garlic into the dough during the last minute of mixing. Rosemary, thyme, and chives work beautifully. Reduce the sugar to two tablespoons to let the savory flavors shine.
Orange Brioche Rolls
Add the zest of one orange to the flour mixture and replace two tablespoons of milk with fresh orange juice. After baking, brush with an orange glaze made from powdered sugar and orange juice.
Chocolate Chip Brioche
Knead one cup of chocolate chips into the dough after the butter is fully incorporated. The rich dough complements the chocolate beautifully, creating rolls that are part breakfast bread, part dessert.
Storage and Reheating Guidelines
Keeping Rolls Fresh
Milk brioche rolls stay soft for three to four days at room temperature when stored properly. Once completely cooled, place them in an airtight container or zip-top bag with as much air pressed out as possible.
Don’t refrigerate brioche rolls unless your kitchen is very hot. Refrigeration actually causes bread to stale faster through a process called retrogradation, where the starches crystallize. Room temperature storage keeps the crumb softer longer.
Freezing for Later
These rolls freeze exceptionally well. Let them cool completely, then wrap individually in plastic wrap and place in a freezer bag. They’ll keep for three months without losing quality.
To thaw, leave wrapped rolls at room temperature for two to three hours, or microwave individual rolls for 15 to 20 seconds. For the best texture, warm thawed rolls in a 300°F oven for five minutes—this refreshes the crust and makes them taste freshly baked.
Reviving Day-Old Rolls
If your rolls have lost some of their freshness, sprinkle them lightly with water and warm them in a 300°F oven for five to seven minutes. The water creates steam that rehydrates the crumb while the heat refreshes the texture.
Alternatively, slice rolls in half and toast them lightly. The caramelization from toasting adds new flavor dimensions while the heat makes them soft inside again.
Serving Suggestions for Every Occasion
As Dinner Rolls
Milk brioche rolls elevate any meal. Their subtle sweetness and rich texture complement everything from pot roast to grilled fish. Serve them warm with softened butter, or take them a step further with compound butter infused with herbs or honey.
For holiday meals, they add an elegant touch that guests always remember. The golden color and glossy finish look as impressive as they taste.
For Breakfast and Brunch
Split these rolls and use them for breakfast sandwiches filled with eggs, bacon, and cheese. The rich dough stands up to hearty fillings while adding its own character.
Toast them and spread with jam, honey, or Nutella for a simple but luxurious breakfast. Their tender crumb soaks up just enough spread without becoming soggy.
Transforming Into Sliders
These rolls make outstanding slider buns. Their size is perfect for mini burgers, pulled pork, or even meatballs. The slightly sweet flavor enhances savory fillings beautifully, and the sturdy-yet-tender texture holds up to juicy ingredients without falling apart.
The Science Behind Soft and Fluffy Brioche
Understanding what makes brioche special helps you bake it better. The high fat content from butter and eggs coats the gluten strands, preventing them from forming tough networks. This is why brioche is tender despite extensive kneading—the fat literally shortens the gluten, creating what bakers call a “short” crumb.
The milk proteins and sugars undergo the Maillard reaction during baking, creating that gorgeous golden-brown crust and contributing complex flavors. This browning reaction happens more dramatically in enriched doughs because of the higher protein and sugar content.
Eggs serve multiple purposes. The yolks add fat and emulsifiers that help bind the butter into the dough. The whites provide moisture and protein that sets during baking, giving structure. Whole eggs give you the best of both worlds.
The long kneading time isn’t just about gluten development—it’s about emulsifying all that butter into the dough structure. When properly mixed, the butter becomes part of the dough matrix rather than sitting in separate pockets. This creates the even, fine crumb that distinguishes good brioche from mediocre.
Tips for First-Time Brioche Bakers
Don’t Fear the Sticky Dough
Brioche dough feels different from regular bread dough. It’s stickier, softer, and seems almost too wet. Trust the process and resist adding extra flour. The dough comes together beautifully with adequate kneading.
If you’re mixing by hand, expect a workout. The dough requires at least 15 minutes of hand kneading, and it will stick to everything initially. Use a bench scraper to help you fold and turn the dough, and lightly oil your hands if needed.
Temperature Control Matters
Brioche is sensitive to temperature. Too warm, and the butter melts out of the dough. Too cold, and the yeast works sluggishly. Aim for a dough temperature of about 75°F after mixing for optimal fermentation.
If your kitchen is very warm, use cool milk and even refrigerate the flour beforehand. If it’s cold, find a warm spot for rising—inside an oven with just the light on works perfectly.
Patience Produces Better Bread
Brioche rewards patience. Rushing the rises produces dense, less flavorful rolls. If you’re short on time, make the dough a day ahead and let it rise slowly in the refrigerator. This actually improves flavor while fitting into your schedule.
The overnight method is popular with professional bakers for good reason. The extended fermentation develops more complex flavors, and the cold dough is easier to shape without sticking.
Why These Soft and Fluffy Bread Easy Recipes You’ll Love Succeed
This recipe succeeds because it balances richness with structure. There’s enough butter and eggs to create tenderness without so much that the dough can’t hold its shape. The milk adds moisture and subtle sweetness, while the yeast provides the rise and characteristic bread flavor.
The technique matters as much as the ingredients. Proper kneading develops the gluten network that gives rolls structure. Adequate proofing allows the yeast to create the air pockets that make bread fluffy. Correct baking temperature sets the structure while creating that beautiful golden crust.
Most importantly, this is an approachable recipe. Yes, brioche has a reputation for difficulty, but following clear steps produces consistent results. You don’t need professional equipment or years of experience—just quality ingredients, attention to detail, and a willingness to learn.
Making Brioche Your Signature Recipe
Once you master basic milk brioche rolls, the variations are endless. Try different shapes—braided loaves, individual buns, or even a classic brioche à tête with its distinctive topknot. Experiment with flavors by adding citrus zest, spices, dried fruits, or nuts.
The fundamental technique remains the same across variations. Learn to recognize how the dough should look and feel at each stage, and you can adapt the recipe confidently. The slightly sticky dough after mixing, the smooth elasticity after kneading, the puffy lightness after proofing—these become familiar touchstones.
Keep notes on your first few batches. Record timing, observations, and results. Baking is part science, part art, and your notes help you understand how your specific kitchen, oven, and ingredients work together.
The Joy of Homemade Bread
There’s something deeply satisfying about pulling a pan of golden brioche rolls from the oven. The rich, buttery aroma fills your kitchen. The rolls are warm and soft, so tender they practically fall apart in your hands. You made these from simple ingredients and your own effort.
Homemade bread connects us to baking traditions that span centuries. Brioche originated in France, where it’s been prized for hundreds of years. When you make these rolls, you’re part of that tradition, creating something that’s nourished and delighted people for generations.
More than that, you’re creating moments. These rolls become part of holiday memories, weekend brunches, and ordinary dinners made special. They’re the bread people request by name, the recipe friends ask you to share, the thing you become known for.
That’s the real magic of milk brioche rolls—they transform flour, butter, and time into something that brings joy. And that’s a recipe worth mastering.
