Main Ingredients
- 4 cups all-purpose flour or bread flour (500g)
- 1/3 cup granulated sugar (65g)
- 2 teaspoons instant yeast (7g)
- 1 teaspoon salt
- 3/4 cup whole milk, warmed (180ml)
- 4 large eggs, room temperature
- 1/2 cup unsalted butter, softened (115g)
- 1 egg yolk for egg wash
- 1 tablespoon milk for egg wash
Choosing the Right Flour
Bread flour creates a slightly chewier texture with more structure, while all-purpose flour yields a more tender, delicate crumb. For the absolute softest milk brioche, all-purpose flour is your best choice. The lower protein content means less gluten development, resulting in that melt-in-your-mouth quality.
Temperature Matters
Room temperature ingredients are crucial for proper emulsification. Cold butter won’t incorporate smoothly into the dough, and cold eggs can shock the yeast, slowing fermentation. Take your eggs and butter out of the refrigerator at least an hour before starting.
Step-by-Step Instructions for Cloud-Like Milk Brioche
Making milk brioche requires patience, but the process itself is straightforward. Follow these detailed steps for guaranteed success.
Mixing the Dough
In a large mixing bowl or the bowl of a stand mixer, combine the flour, sugar, yeast, and salt. Whisk these dry ingredients together to distribute the yeast evenly throughout the flour.
In a separate bowl, whisk together the warm milk and eggs until well combined. The milk should be warm to the touch but not hot—around 100°F (38°C) is ideal. Too hot will kill the yeast, too cold will slow down activation.
Pour the wet ingredients into the dry ingredients. If using a stand mixer, attach the dough hook and mix on low speed for about 2 minutes until everything comes together into a shaggy dough. If mixing by hand, use a wooden spoon to combine, then begin kneading in the bowl.
Incorporating the Butter
This is the most critical step for achieving that super soft texture. With the mixer running on medium-low speed, add the softened butter one tablespoon at a time, waiting until each addition is fully incorporated before adding the next. This process takes about 10-12 minutes total.
The dough will look like it’s falling apart when you first start adding butter—this is completely normal. Keep mixing, and it will come together into a smooth, glossy, elastic dough. When properly developed, the dough should be tacky but not sticky, and it should pull away from the sides of the bowl.
If kneading by hand, this process requires about 15-20 minutes of vigorous kneading on a lightly floured surface. Add butter gradually, working it in completely before adding more.
The First Rise
Transfer the dough to a lightly greased bowl, turning it once to coat all sides with oil. Cover with plastic wrap or a damp kitchen towel. Let it rise in a warm, draft-free location for 1.5 to 2 hours, or until doubled in size.
The ideal rising temperature is between 75-80°F (24-27°C). If your kitchen is cold, you can create a warm environment by turning your oven on for just 1 minute, turning it off, and then placing the covered bowl inside.
Shaping Your Brioche
Once doubled, punch down the dough gently to release air bubbles. Turn it out onto a lightly floured surface. This recipe makes enough dough for one large loaf pan (9×5 inches) or two smaller loaf pans.
For a classic loaf shape, divide the dough into three equal pieces. Roll each piece into a rope about 12 inches long. Braid the three ropes together, tucking the ends underneath. Place the braided loaf into a greased pan.
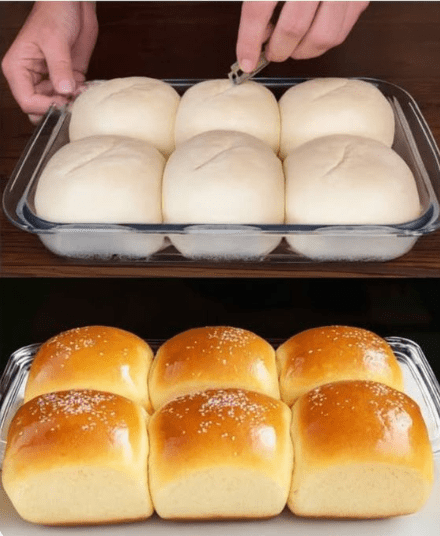
For individual rolls, divide the dough into 12 equal pieces. Roll each piece into a smooth ball by cupping your hand over it and rolling in circular motions on the work surface. Arrange the balls in a greased 9×13 inch baking pan, leaving a little space between each one.
The Second Rise
Cover the shaped dough loosely with plastic wrap or a kitchen towel. Let it rise again for 45-60 minutes until puffy and nearly doubled. The dough should spring back slowly when gently pressed with a finger.
During this time, preheat your oven to 350°F (175°C). Position the rack in the center of the oven for even baking.
Egg Wash and Baking
Just before baking, whisk together the egg yolk and one tablespoon of milk to create an egg wash. Using a pastry brush, gently brush the egg wash over the entire surface of the risen dough. This creates that beautiful golden-brown, glossy crust that makes brioche so visually stunning.
Bake for 25-30 minutes for a loaf, or 18-22 minutes for individual rolls. The brioche is done when the top is deep golden brown and the internal temperature reaches 190°F (88°C) when tested with an instant-read thermometer.
If the top is browning too quickly, tent it loosely with aluminum foil during the last 10 minutes of baking.
Cooling
Remove from the oven and let the brioche cool in the pan for 10 minutes. This brief resting period allows the structure to set, making it easier to remove from the pan without tearing.
Turn the loaf out onto a wire rack to cool completely. While it’s tempting to slice into warm brioche immediately, letting it cool for at least 30 minutes ensures cleaner slices and allows the texture to fully develop.
Pro Tips for the Softest Milk Brioche Every Time
Mastering a few key techniques elevates your milk brioche from good to exceptional.
Don’t Rush the Rising Times
Brioche needs adequate time for proper fermentation. The first rise develops flavor, while the second rise creates the final texture. Rushing these steps results in dense bread with less developed taste. If you have time, you can do the first rise in the refrigerator overnight—this slow fermentation creates even more complex flavors.
Use the Windowpane Test
To check if your dough is properly kneaded, perform the windowpane test. Take a small piece of dough and gently stretch it between your fingers. If you can stretch it thin enough to see light through it without it tearing, the gluten is adequately developed. If it tears immediately, continue kneading.
Keep Everything Warm
Brioche dough loves warmth. Cold drafts slow yeast activity and can prevent proper rising. During winter months, consider letting your dough rise in a slightly warm oven (turned off) or near a warm stovetop.
Brush with Butter After Baking
For an extra layer of richness and shine, brush the hot brioche with melted butter immediately after removing it from the oven. This adds flavor and keeps the crust soft rather than crispy.
Variations and Flavor Additions
While classic milk brioche is perfect on its own, you can customize it with various additions and flavors.
Chocolate Chip Milk Brioche
Fold in 1 cup of chocolate chips after the butter is fully incorporated. Use a combination of dark and milk chocolate for depth of flavor. The melted chocolate pockets throughout the soft bread create an irresistible treat.
Cinnamon Swirl Version
After the first rise, roll the dough into a rectangle. Brush with melted butter and sprinkle generously with cinnamon sugar (1/2 cup sugar mixed with 2 tablespoons cinnamon). Roll up tightly, place in a loaf pan, and proceed with the second rise and baking.
Orange Zest Brioche
Add the zest of two oranges to the dry ingredients before mixing. The citrus oils infuse throughout the dough, creatin
