| Category | Duration |
| Total Time | 30 minutes |
| Prep Time | 10 minutes |
| Cook Time | 15 minutes |
| Cool Time | 5 minutes |
Step-by-Step Preparation
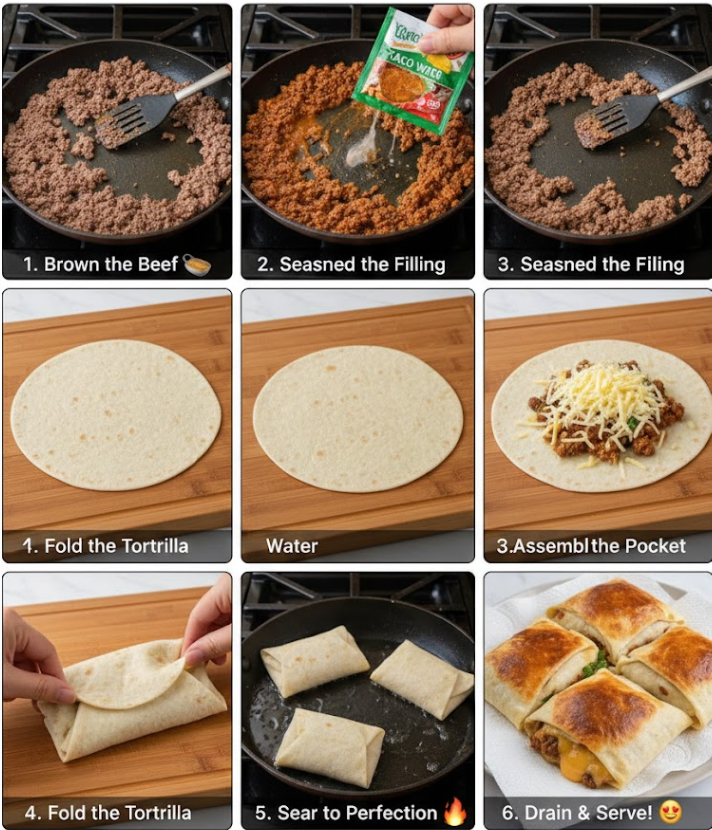
1. Brown the Beef: In a large skillet over medium-high heat, cook the ground beef until it is fully browned and no longer pink. Drain any excess grease from the pan to ensure the pockets don’t become soggy.
2. Season the Filling: Add the taco seasoning and water to the beef. Simmer for about 5 minutes until the liquid has reduced and the meat is well-coated. Remove from heat and let it sit for a moment.
3. Assemble the Pockets: Lay a flour tortilla flat. Place a generous sprinkle of cheese in the center, followed by 2-3 tablespoons of the taco meat. Add another layer of cheese on top of the meat to act as “glue.”
4. Fold the Tortilla: Fold the left and right sides of the tortilla toward the center. Then, fold the top and bottom edges over to create a tight, rectangular pocket. Ensure the seams are tucked securely. 🧀
5. Sear to Perfection: Heat oil in a clean skillet over medium heat. Place the Loaded Cheesy Pocket Tacos seam-side down in the pan. Fry for 2-3 minutes per side until the exterior is golden brown and the cheese inside has completely melted.
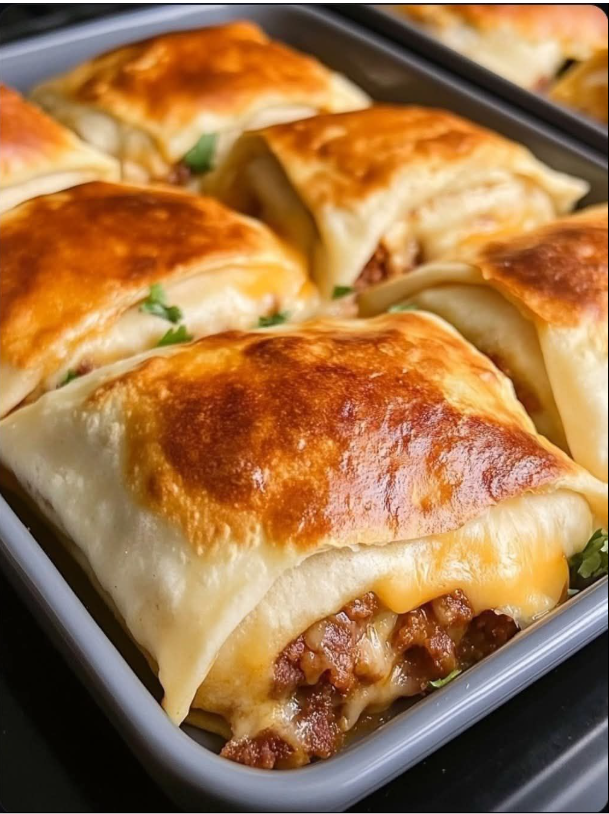
6. Drain and Serve: Remove the pockets from the pan and place them on a paper towel-lined plate to remove excess oil. Let them cool slightly before serving to allow the cheese to set.
Pro Tips for the Best Loaded Cheesy Pocket Tacos
To achieve the best results with your Loaded Cheesy Pocket Tacos, use room-temperature tortillas. Cold tortillas are more likely to crack or tear during the folding process. If yours are chilled, microwave them for 15 seconds under a damp paper towel to make them pliable. Additionally, don’t overfill the pockets; leaving enough room to fold the edges tightly is the secret to preventing the filling from leaking into the pan.
Nutrition Facts (Per Serving)
- Calories: 340 kcal
- Protein: 22g
- Total Fat: 18g
- Carbohydrates: 24g
- Sodium: 680mg
Serving and Storage Tips
These handheld delights are best served warm with a side of zesty salsa, guacamole, or a cool lime-crema. For a refreshing contrast, serve them alongside a crisp garden salad or Mexican street corn.
If you have leftovers, store them in an airtight container in the refrigerator for up to 3 days. To maintain the crispy texture when reheating, avoid the microwave. Instead, place them in an oven or air fryer at 350°F for 5-8 minutes. This ensures the tortilla regains its crunch while the cheese returns to its melted state. 😋
Frequently Asked Questions
Can I bake these instead of frying them?
Yes! You can bake them at 400°F for about 12-15 minutes, flipping halfway through. Brush the tops with a little melted butter or oil to help them brown.
Can I use different proteins?
Absolutely. While ground beef is classic, shredded chicken or ground turkey work beautifully in this recipe. Just ensure the meat is fully cooked before folding.
Are these freezer-friendly?
Yes. You can freeze the assembled pockets (before frying) by wrapping them individually in plastic wrap. Cook them directly from frozen by adding a few extra minutes to the frying or baking time.
Conclusion
Whether you are looking for a quick lunch or a crowd-pleasing appetizer, Loaded Cheesy Pocket Tacos deliver maximum flavor with minimal effort. Their portable nature makes them a hit for families on the go, and the customization options are endless.
What are your favorite taco toppings to tuck inside? If you try this recipe at home, share your results and let us know which cheese blend worked best for your crispy pockets! ✨
Would you like me to suggest some dipping sauce recipes to pair with these tacos?
