The beauty of this recipe lies in its minimal ingredient list. You probably have everything in your pantry right now:
Basic Ingredients:
- 3 cups all-purpose flour (or bread flour for extra chewiness)
- 1½ teaspoons salt
- ¼ teaspoon instant yeast (yes, just a quarter teaspoon!)
- 1½ cups warm water
That’s it. Four ingredients. No eggs to crack, no butter to soften, no milk to measure. Just flour, salt, yeast, and water coming together to create something extraordinary.
Why These Ingredients Work So Well
The minimal yeast might surprise you, but it’s intentional. Using less yeast and allowing a longer rise time develops more complex flavors. The slow fermentation process creates that slightly tangy, nutty taste you find in expensive bakery bread.
The salt isn’t just for flavor—it strengthens the gluten structure and controls the yeast activity. The water hydrates the flour and creates the steam that gives you that crispy, crackling crust everyone loves.
Step-by-Step Instructions for Perfect Bread Every Time
Mixing the Dough (5 Minutes)
Grab a large mixing bowl and combine your flour, salt, and yeast. Give it a quick stir with a wooden spoon to distribute everything evenly. Pour in the warm water—it should be comfortable to touch, around room temperature or slightly warmer.
Stir everything together until you have a shaggy, sticky dough. Don’t worry if it looks messy and rough. That’s exactly what you want. The mixture should be wet enough that you couldn’t shape it with your hands, but thick enough that it holds together in a mass.
This entire mixing process takes about three to four minutes. No precise measurements of mixing time, no checking for specific consistency. Just combine and move on.
The Resting Period (12-18 Hours)
Cover your bowl with plastic wrap or a clean kitchen towel. Place it somewhere at room temperature, away from direct sunlight or drafts. Now comes the hardest part—walking away and letting time do the work.
During this long rest, the yeast slowly ferments the dough, creating flavor and structure. The gluten strands align and strengthen without any kneading from you. It’s essentially bread making on autopilot.
I usually mix my dough before bed and let it rest overnight. By morning, it’s ready for the next step. If you need to adjust the timing, anywhere from 12 to 18 hours works perfectly.
Shaping Without Kneading (2 Minutes)
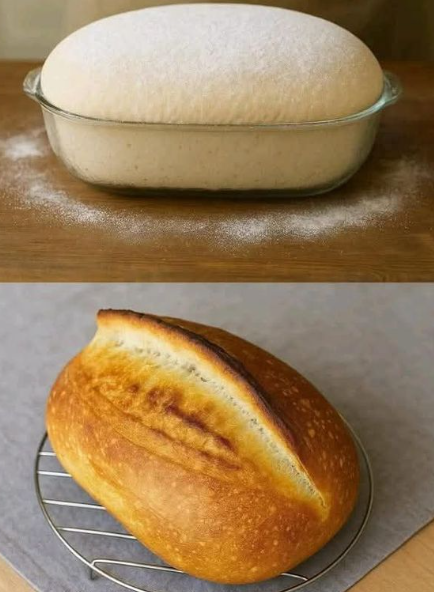
After the rest period, your dough will have doubled in size and look bubbly on the surface. Lightly flour your countertop and scrape the dough out of the bowl. It will be soft and stretchy.
Using floured hands, gently fold the dough over itself a few times—maybe four or five folds total. You’re not kneading; you’re just gently bringing it together into a rough ball shape. The whole process takes less than two minutes.
Place your shaped dough on a piece of parchment paper and cover it with the same towel. Let it rest for another hour or two while you preheat your oven.
The Baking Secret (45 Minutes)
Here’s where the magic happens. Place a Dutch oven or any heavy pot with a lid into your oven. Preheat everything together to 450°F (230°C) for at least 30 minutes.
When your oven and pot are screaming hot, carefully remove the pot and lift the parchment paper with your dough into it. Cover with the lid and return to the oven.
Bake covered for 30 minutes. This creates a steamy environment that helps the bread rise and develop that incredible crust. Then remove the lid and bake for another 15 minutes until the loaf is deeply golden brown.
Troubleshooting Common Issues
My Dough Didn’t Rise Much
Check your yeast’s expiration date. Even though we use a small amount, it needs to be active. Also, ensure your rising location isn’t too cold—below 65°F can significantly slow yeast activity.
The Bread Is Too Dense
This usually means the dough needed more resting time. Dense bread often results from rushing the first rise. Make sure you’re giving it the full 12 hours minimum.
The Crust Is Too Hard
While a crackling crust is desirable, if it’s tooth-breaking hard, your oven might be running hot. Try reducing the temperature by 25 degrees, or shorten the uncovered baking time slightly.
Creative Variations to Try
Herb and Garlic Bread
Add two tablespoons of dried herbs (rosemary, thyme, or Italian seasoning) and one tablespoon of garlic powder to your dry ingredients. The aroma while baking is absolutely divine.
Whole Wheat Version
Replace one cup of all-purpose flour with whole wheat flour. You might need to add an extra tablespoon or two of water since whole wheat absorbs more liquid. This creates a heartier, nuttier loaf.
Seeds and Grains
Fold in a handful of sunflower seeds, pumpkin seeds, or rolled oats during the initial mixing. This adds wonderful texture and nutritional value without complicating the process.
Sweet Cinnamon Raisin
For a breakfast treat, add a tablespoon of sugar, a teaspoon of cinnamon, and half a cup of raisins to your dough. It transforms into something perfect for morning toast.
Storage Tips to Keep Your Bread Fresh
Fresh bread without preservatives requires proper storage. Once your loaf has cooled completely—and this is important, never store warm bread—you have several options.
For short-term storage (two to three days), keep it cut-side down on a cutting board, covered with a clean kitchen towel. This maintains the crust’s texture while keeping the interior soft.
For longer storage, slice the loaf and freeze it in a resealable bag. Individual slices can go straight from freezer to toaster, making quick breakfasts incredibly convenient.
Avoid refrigerating bread, as this actually makes it go stale faster due to a process called retrogradation where the starch molecules reorganize.
The Health Benefits of Homemade Bread
When you make bread at home, you control every ingredient. There are no preservatives, no added sugars (unless you choose to include them), and no mysterious additives with unpronounceable names.
Store-bought bread often contains dough conditioners, high fructose corn syrup, and various preservatives to extend shelf life. Your homemade version is pure, simple, and wholesome.
The long fermentation process also makes the bread easier to digest. The extended rest time allows enzymes to break down some of the complex carbohydrates and gluten, which many people find gentler on their digestive system.
Making Bread Baking a Weekly Habit
The beauty of this recipe is how easily it fits into your routine. I’ve developed a simple schedule that works perfectly with a busy lifestyle.
Sunday evening, I mix the dough before dinner. It takes five minutes max. Monday morning, while I’m having coffee, I shape it and let it rest. By lunchtime, I’m pulling a fresh loaf from the oven. Wednesday evening, I repeat the process. By Thursday, there’s fresh bread again.
This rhythm means I always have homemade bread available without it feeling like a chore. The hands-on time is minimal, maybe 15 minutes total per loaf when you add up mixing, shaping, and transferring to the oven.
Teaching Kids This Simple Recipe
This recipe is fantastic for getting children involved in cooking. The minimal ingredient list means less chance for errors, and the forgiving nature of the dough makes it stress-free.
Kids can measure the ingredients, mix the dough, and even help with the simple shaping. Watching the dough transform over time teaches patience and basic food science. Plus, there’s nothing quite like the pride on a child’s face when they’ve baked their first loaf of bread.
Comparing Homemade to Store-Bought
I used to think store-bought bread was convenient and “good enough.” Now that I’ve made this recipe dozens of times, I can’t imagine going back. The flavor difference is remarkable—this bread has depth and character that mass-produced loaves simply can’t match.
The texture is another revelation. That crispy, shattering crust surrounding a soft, airy interior with irregular holes—it’s what bread should taste and feel like. Commercial bread, even expensive artisan varieties, often can’t compare because they’re optimized for consistency and shelf life rather than flavor and texture.
Your New Bread-Making Journey Starts Now
I don’t buy bread anymore, and after trying this recipe, I doubt you will either. The combination of simplicity, cost savings, and superior results makes it one of those rare discoveries that genuinely improves daily life.
You don’t need to be an experienced baker. You don’t need special equipment. You don’t even need to be home for most of the process. Just mix four simple ingredients, let time work its magic, and enjoy bread that rivals anything from a professional bakery.
The first loaf might feel like an experiment, but by the second or third, you’ll realize this isn’t just a recipe—it’s a new kitchen skill that pays dividends for years to come. Fresh bread whenever you want it, for pennies per loaf, with almost zero effort.
Give it a try this week. Mix the dough tonight, and wake up tomorrow to the possibility of fresh homemade bread. Your kitchen will smell amazing, your wallet will thank you, and you’ll wonder why you didn’t start baking bread years ago.
