Growth Cycle and Timeline
Ginger follows a predictable growth pattern that helps you plan your harvest. After planting, you’ll see the first shoots emerge within two to three weeks if conditions are right. These shoots develop into tall stalks with leaves that perform photosynthesis to feed the growing rhizome underground.
During the first three months, the plant focuses primarily on establishing its root system and producing foliage. This foundation period is crucial for future rhizome development, so resist the urge to harvest during this time.
Between months four and eight, the rhizome expands significantly underground. This is when the magic happens—the ginger you’ll eventually harvest is forming and growing beneath the soil surface. The more robust the above-ground growth during this period, the larger your eventual harvest.
After eight to ten months, the plant reaches maturity. The leaves may begin to yellow and die back, signaling that the rhizome has reached full size. This is the ideal time for a complete harvest, though you can harvest portions earlier if needed.
Selecting the Perfect Ginger for Planting
What to Look for at the Grocery Store
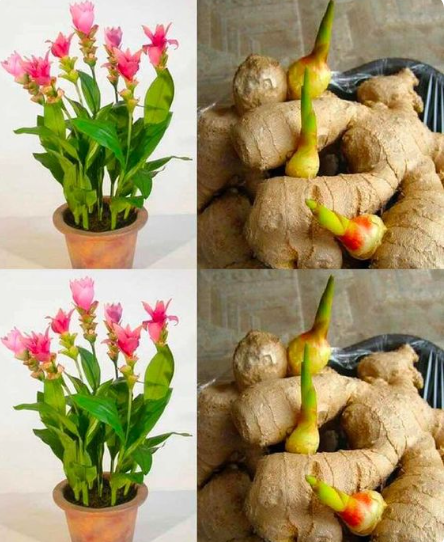
Start your ginger-growing journey by selecting quality rhizomes from your local grocery store or Asian market. Look for pieces that are plump, firm, and have smooth, tight skin. The ginger should feel heavy for its size, indicating good moisture content.
The most important feature to look for is visible growth buds, which appear as small, greenish-white or yellowish bumps on the rhizome surface. These buds are the “eyes” similar to those on potatoes, and they’re where new shoots will emerge. Choose ginger with multiple growth buds to maximize your planting options.
Avoid ginger that feels soft, wrinkled, or moldy. These characteristics indicate old or improperly stored ginger that likely won’t sprout successfully. Also skip any pieces that appear dried out or have an off smell, as these won’t have enough vitality to produce strong growth.
Organic ginger is strongly preferred for planting because conventional ginger is often treated with growth inhibitors to prevent sprouting during storage and transport. These chemicals can prevent or significantly delay sprouting when you try to grow the ginger. While organic ginger costs slightly more, it’s worth the investment for successful growing.
Preparing Your Ginger for Planting
Once you’ve selected your ginger, you can plant it immediately or encourage sprouting first. Some growers prefer to pre-sprout their ginger by placing it in a shallow dish of water on a sunny windowsill for a few days. This method can jumpstart the growth process, though it’s not strictly necessary.
If your ginger piece has multiple growth buds, you can cut it into sections to create multiple plants. Each section should be at least two to three inches long with at least one or two visible growth buds. Use a clean, sharp knife to make your cuts, and let the cut surfaces dry and callous over for 24 to 48 hours before planting. This healing period helps prevent rot.
Soaking the ginger pieces in room-temperature water overnight before planting can help rehydrate them and encourage faster sprouting, especially if the ginger has been sitting in storage for a while and appears slightly dried.
Choosing the Right Container and Soil
Container Selection for Optimal Growth
The right container makes a significant difference in your ginger-growing success. Choose a pot that’s at least 12 inches wide and 10 to 12 inches deep. Ginger rhizomes grow horizontally, so width matters more than depth. A wide, shallow container works better than a tall, narrow one.
Adequate drainage is absolutely essential. Your container must have drainage holes in the bottom to prevent water from accumulating and causing root rot. Ginger tolerates neither soggy soil nor drought conditions well, so proper drainage maintains the delicate moisture balance these plants need.
Plastic, ceramic, or terracotta pots all work well for ginger. Terracotta offers the advantage of being porous, which helps prevent overwatering by allowing some moisture to evaporate through the pot walls. However, this means you’ll need to water slightly more frequently. Plastic containers retain moisture longer, which can be helpful if you occasionally forget to water.
Consider using a drip tray or saucer beneath your pot to catch excess water and protect your surfaces. Just remember to empty the tray after watering so the pot doesn’t sit in standing water.
Creating the Ideal Soil Mix
Ginger thrives in rich, loose, well-draining soil with plenty of organic matter. The perfect soil mix for ginger should hold moisture while allowing excess water to drain freely. Heavy, compacted soil leads to root rot and poor growth.
Create an ideal ginger-growing medium by combining equal parts high-quality potting soil, compost, and perlite or coarse sand. The potting soil provides structure and basic nutrients, compost adds organic matter and slow-release nutrition, and perlite or sand improves drainage and aeration.
If you prefer to use pre-made products, look for potting mixes labeled for vegetables or container gardening. Avoid garden soil, which is too dense for container growing and may contain pests or diseases. You can improve any potting mix by adding extra compost for nutrition and perlite for drainage.
Ginger prefers slightly acidic soil with a pH between 6.0 and 6.5. While you don’t need to test your soil pH obsessively, starting with quality potting mix designed for vegetables typically provides an appropriate pH range.
Step-by-Step Planting Instructions
Preparing Your Container
Fill your chosen container with your soil mixture, leaving about two inches of space at the top. Moisten the soil thoroughly before planting—it should be damp but not waterlogged. Pre-moistening the soil helps ensure even moisture distribution and prevents dry pockets that could stress your newly planted ginger.
If you’re planting multiple pieces of ginger in one large container, space them at least six to eight inches apart. This spacing allows each rhizome room to expand without competing for space and nutrients.
Planting Your Ginger
Place your ginger pieces on the soil surface with the growth buds pointing upward. This positioning is crucial—the buds need to face up so the shoots can emerge toward the light. Press the ginger gently into the soil so it’s secure but not completely buried.
Cover the ginger with approximately one to two inches of soil. Some growers prefer to leave the very tips of the growth buds just barely visible, while others cover them completely. Both methods work, though leaving them slightly exposed helps you monitor for early sprouting.
Water gently but thoroughly after planting until water drains from the bottom of the pot. This initial watering settles the soil around the ginger and ensures good soil-to-rhizome contact, which helps the roots establish.
Initial Care After Planting
After planting, place your container in a warm location. Ginger needs consistent warmth to sprout, ideally between 75 and 85 degrees Fahrenheit. The top of your refrigerator, near a heating vent, or in a naturally warm room often provides suitable temperatures.
Keep the soil lightly moist but never soggy during the sprouting phase. Check the soil every few days and water when the top inch feels dry. Overly wet soil at this stage often causes the rhizome to rot before it sprouts.
Be patient during this initial period. Sprouting typically takes two to three weeks, though it can take up to a month depending on the ginger’s vitality and your growing conditions. Resist the urge to dig up the ginger to check on it, as this disturbs the developing roots.
Providing Ideal Growing Conditions
Light Requirements
Once your ginger sprouts, light becomes increasingly important. Ginger plants prefer bright, indirect light or partial shade. Direct, intense sunlight can scorch the leaves, while too little light results in weak, spindly growth.
An east-facing window that receives gentle morning sun works perfectly for ginger. North-facing windows provide adequate light if they’re bright, while south and west-facing windows may be too intense unless you place the plant a few feet back from the glass or filter the light with a sheer curtain.
If natural light is limited in your kitchen, supplement with a grow light positioned 6 to 12 inches above the plant. LED grow lights work wonderfully for ginger and don’t generate excessive heat that could stress the plant.
Ginger tolerates lower light conditions better than many edible plants, making it one of the more forgiving options for indoor growing. However, plants grown in optimal light conditions produce larger, more flavorful rhizomes.
Temperature and Humidity
Maintaining appropriate temperature is key to successful ginger growth. The ideal range is 75 to 85 degrees Fahrenheit during the day, with slightly cooler nights. Most home kitchens naturally fall within or close to this range year-round.
Avoid placing ginger near cold windows in winter or air conditioning vents in summer, as temperature fluctuations and cold drafts stress the plant. Similarly, keep it away from heat sources like stoves or radiators that create hot spots.
Ginger appreciates humidity levels between 50 and 70 percent, which is higher than typical indoor environments, especially during winter when heating systems dry the air. Increase humidity around your ginger by misting the leaves every few days, placing the pot on a tray filled with pebbles and water (ensuring the pot sits on the pebbles, not in the water), or using a small humidifier nearby.
Grouping multiple houseplants together creates a microclimate with higher humidity as the plants transpire moisture into the surrounding air.
Watering Guidelines
Proper watering makes the difference between thriving ginger and struggling or rotting rhizomes. Ginger likes consistently moist soil—not wet, not dry, but evenly moist like a well-wrung sponge.
During active growth periods, check your ginger every few days. Stick your finger about an inch into the soil near the edge of the pot. If it feels dry at that depth, it’s time to water. If it still feels moist, wait another day or two.
Water thoroughly when you do water, allowing water to flow through the drainage holes. This thorough watering ensures the entire root zone receives moisture and helps prevent salt buildup in the soil from fertilizers.
Reduce watering slightly during winter months when growth slows, but never let the soil dry out completely. Ginger is a tropical plant that doesn’t truly go dormant like many temperate plants do.
Fertilizing Your Indoor Ginger
Choosing the Right Fertilizer
Ginger plants are moderate feeders that benefit from regular fertilization during the growing season. Choose a balanced, all-purpose liquid fertilizer with an NPK ratio around 10-10-10 or 5-5-5. Organic options like fish emulsion or liquid kelp work excellently and provide trace minerals beyond basic NPK.
Slow-release granular fertilizers also work well for ginger. Apply them according to package directions at planting time and again every three months. These fertilizers release nutrients gradually, providing consistent feeding without the need for frequent applications.
Fertilizing Schedule
Begin fertilizing your ginger about six weeks after planting, once the shoots have emerged and established themselves. Fertilize every two to three weeks during active growth periods (spring and summer) using a diluted liquid fertilizer at half the package-recommended strength.
This “little and often” approach provides steady nutrition without risk of fertilizer burn. Ginger responds better to consistent, moderate feeding than infrequent heavy applications.
Reduce fertilization to once monthly during fall and winter when growth naturally slows. Some growers stop fertilizing completely during the shortest days of winter, resuming in early spring when day length increases and growth picks up.
Always water your ginger before fertilizing to prevent root burn. Never apply fertilizer to dry soil, as the concentrated nutrients can damage roots.
Ongoing Care and Maintenance
Pruning and Grooming
Ginger requires minimal pruning since you’re growing it for the rhizome rather than the foliage. However, removing yellow or brown leaves keeps the plant looking attractive and prevents potential disease issues.
Use clean scissors or pruning shears to cut away dead leaves at the base. Wipe your cutting tools with rubbing alcohol between cuts to prevent spreading any diseases.
If your ginger grows very tall and becomes top-heavy, you can trim back some of the height, though this isn’t usually necessary with indoor plants.
Pest Management
Indoor ginger typically faces fewer pest problems than outdoor plants, but spider mites, fungus gnats, and occasionally aphids can appear. Regular inspection helps you catch pest problems early before they become serious.
Spider mites create fine webbing on leaves and cause stippling or yellowing. Combat them by regularly misting your plant, wiping leaves with a damp cloth, or spraying with insecticidal soap.
Fungus gnats indicate overly moist soil and don’t directly harm the ginger, though they’re annoying. Reduce watering frequency, allow the top inch of soil to dry between waterings, and consider adding a layer of sand to the soil surface to deter egg-laying.
For any pest problem, isolate the affected plant from other houseplants to prevent spread. Neem oil spray works as an effective organic treatment for most common houseplant pests.
Recognizing and Solving Common Problems
Yellow leaves can indicate overwatering, underwatering, or nutrient deficiency. Check soil moisture first and adjust watering accordingly. If moisture levels seem appropriate, increase fertilization.
Brown leaf tips usually result from low humidity or salt buildup in the soil. Increase humidity and flush the soil occasionally by running water through the pot for several minutes to remove accumulated salts.
Slow or stunted growth often indicates insufficient light or nutrients. Move the plant to a brighter location and ensure you’re fertilizing regularly during growing season.
If the rhizome feels soft or mushy and emits an unpleasant odor, rot has set in from overwatering or poor drainage. Unfortunately, rot is difficult to reverse. Remove the plant, examine the rhizome, cut away any rotted portions, let the healthy sections dry for 24 hours, and replant in fresh, dry soil.
Harvesting Your Homegrown Ginger
When to Harvest
You can begin harvesting small amounts of ginger after about four months of growth, once the plant is well-established. This “baby ginger” has thinner skin and a milder, slightly less fibrous texture than fully mature ginger.
For full-sized rhizomes with maximum flavor intensity, wait eight to ten months until the leaves begin yellowing and dying back naturally. This signals that the rhizome has reached full maturity and maximum size.
Time your harvest based on your needs. If you want a steady supply of small amounts of fresh ginger throughout the year, harvest portions while keeping the plant growing. For maximum yield all at once, wait for full maturity.
Harvesting Techniques
For partial harvests, gently dig away soil from one edge of the container until you expose part of the rhizome. Cut or break off a piece of ginger from the outer edge, being careful not to damage the main rhizome and roots. Replace the soil and water well. The plant will continue growing and producing more ginger.
This careful approach allows you to harvest what you need while keeping your ginger plant productive. You can do partial harvests multiple times throughout the year.
For complete harvest, wait until the leaves die back, then stop watering for about two weeks. This slight dry period makes harvesting cleaner and easier. Dump the entire pot, remove all the soil, and harvest the ginger rhizomes.
Rinse harvested ginger under cool water, gently scrubbing away any soil with a soft brush. Pat dry with a towel.
Using and Storing Your Harvest
Fresh ginger keeps for several weeks at room temperature or up to a month in the refrigerator’s crisper drawer. For longer storage, you can freeze ginger whole or grated. Frozen ginger actually becomes easier to grate, and you can grate it directly from frozen without thawing.
Thinly slice or grate ginger for maximum flavor in cooking. The skin of young, homegrown ginger is thin and tender enough that you often don’t need to peel it—just scrub it clean.
Save some of your harvested ginger for replanting. Store pieces you intend to plant in a cool, dry place until you’re ready to start the growing cycle again.
Propagating More Ginger Plants
After your first successful harvest, you’ll have plenty of ginger rhizomes to expand your indoor garden or share with friends. Each rhizome can be divided into multiple sections for planting, just as you did with your original store-bought ginger.
The advantage of using your own harvested ginger for propagation is that you know it’s completely fresh and hasn’t been treated with growth inhibitors. These homegrown rhizomes often sprout faster and more reliably than store-bought ginger.
Consider starting new ginger plantings every few months to create a rotating harvest schedule. With three or four pots at different stages of growth, you can harvest fresh ginger year-round without ever depleting your supply.
Troubleshooting Growing Problems
My Ginger Won’t Sprout
If three to four weeks have passed with no signs of sprouting, the problem is usually temperature, moisture, or non-viable ginger. Ensure the soil temperature stays consistently between 75 and 85 degrees. Cold soil delays or prevents sprouting.
Check that the soil is moist but not waterlogged. Both extremes prevent sprouting—dry soil doesn’t provide the moisture needed for growth, while soggy soil causes rot.
If conditions are correct but nothing happens, your ginger may have been treated with growth inhibitors or was too old to be viable. Start over with fresh organic ginger.
Leggy, Weak Growth
Tall, thin stems with pale leaves indicate insufficient light. Move your ginger to a brighter location or supplement with a grow light. Ginger tolerates moderate light but produces sturdier, healthier growth in bright, indirect light.
No Rhizome Growth
If your ginger produces beautiful foliage but harvesting reveals minimal rhizome development, the plant likely needs more time. Remember that significant rhizome growth happens between months four and eight. Harvesting too early yields disappointingly small results.
Insufficient nutrients can also limit rhizome development. Ensure you’re fertilizing regularly during the growing season with a balanced fertilizer.
The Rewards of Kitchen Ginger Growing
How to grow ginger in your kitchen ultimately comes down to providing consistent warmth, moderate light, regular moisture, and patience. This tropical plant adapts remarkably well to indoor conditions, producing an impressive harvest from a single store-bought rhizome.
The process teaches valuable lessons about plant growth cycles and the patience required for successful gardening. Unlike fast-growing herbs, ginger rewards those who can wait and provide steady, attentive care over many months.
Beyond the practical benefits of fresh ginger always available, growing your own creates a deeper connection to your food. You’ll appreciate each piece of ginger knowing the time and care invested in growing it. The flavor difference between freshly harvested homegrown ginger and store-bought ginger is remarkable—more vibrant, aromatic, and complex.
Start your ginger-growing journey today with a trip to your grocery store. Select a beautiful piece of organic ginger with visible growth buds, plant it following these guidelines, and mark your calendar for eight months from now. Your future self will thank you when you’re harvesting fresh, homegrown ginger right from your kitchen counter.
