Preparation Timeline
| Phase | Time |
| Total Time | 6 Hours 15 Minutes |
| Prep Time | 15 Minutes |
| Cook Time | 0 Minutes |
| Cool Time | 6 Hours |
Step-by-Step Preparation
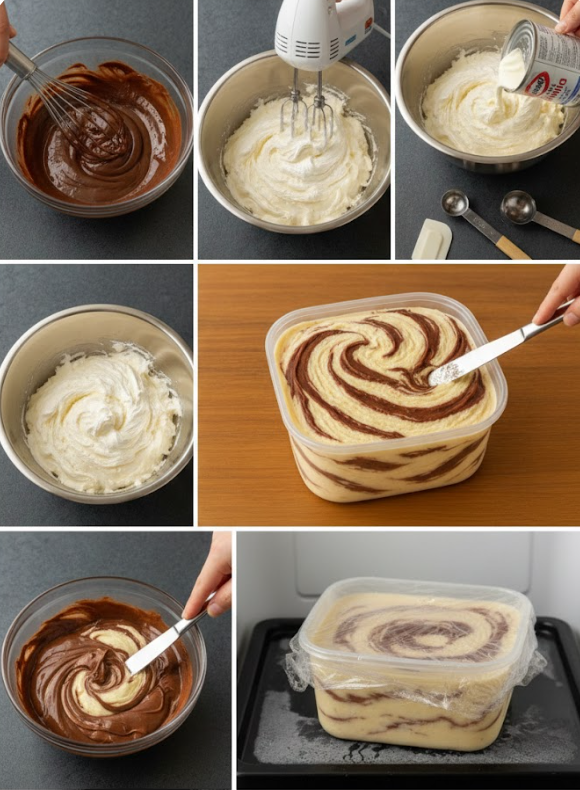
1. In a small bowl, whisk the cocoa powder with two tablespoons of hot water until it forms a smooth, thick paste. Set this aside to cool completely.
2. In a large chilled mixing bowl, beat the heavy whipping cream on medium-high speed until stiff peaks form. Be careful not to overbeat, as the cream can quickly turn into butter.
3. Gently fold the sweetened condensed milk and vanilla extract into the whipped cream using a spatula. Use a slow, circular motion to keep as much air in the mixture as possible.
4. Divide the base mixture. Take about one cup of the white cream base and thoroughly mix it with the prepared chocolate paste until uniform.
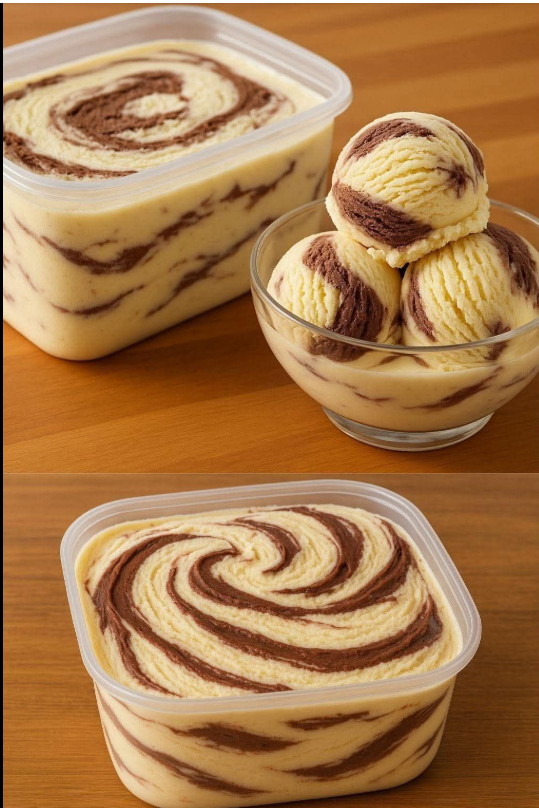
5. In a freezer-safe container, alternate scoops of the vanilla base and the chocolate mixture. Use a butter knife or a skewer to gently swirl the two together, creating a beautiful marbled pattern. 🍫
6. Cover the container tightly with plastic wrap or a lid. Place it in the coldest part of your freezer for at least 6 hours, or ideally overnight, until firm.
Why Choose Easy Homemade Ice Cream?
The primary benefit of this method is control. Commercial ice creams often contain stabilizers like guar gum or carrageenan to extend shelf life. When you opt for Easy Homemade Ice Cream, you are using pure ingredients without hidden preservatives. Additionally, the lack of an ice cream maker means less kitchen clutter and a quieter preparation process.
Customizing Your Easy Homemade Ice Cream Flavors
Once you master the basic swirl, the possibilities are endless. You can replace the chocolate swirl with a fruit compote, crushed cookies, or even a salted caramel ribbon. Because this base is so stable, it holds “mix-ins” exceptionally well, ensuring that every scoop is packed with flavor and texture. 🍨
Nutrition Facts (Per Serving)
- Calories: 290 kcal
- Total Fat: 18g
- Saturated Fat: 11g
- Cholesterol: 55mg
- Sodium: 65mg
- Total Carbohydrates: 28g
- Sugars: 26g
- Protein: 4g
Serving and Storage Tips
For the best experience, remove the container from the freezer about 5 to 10 minutes before serving. This allows the edges to soften slightly, making it easier to achieve those perfect, round scoops.
To store, keep the ice cream in an airtight container to prevent freezer burn. Placing a piece of parchment paper or wax paper directly onto the surface of the ice cream before sealing the lid will help maintain that fresh, creamy texture for up to two weeks. 😋
Frequently Asked Questions
Can I use low-fat milk instead of heavy cream?
Unfortunately, no. The high fat content in the heavy cream is what prevents the formation of large ice crystals, ensuring the dessert stays creamy rather than icy.
Does this recipe require an ice cream maker?
No, this is a “no-churn” recipe. The air whipped into the cream provides the necessary structure, so no churning equipment is needed.
Why is my ice cream too hard to scoop?
Homemade versions lack chemical softeners. Letting it sit at room temperature for a few minutes will quickly solve this.
Final Thoughts on Your Frozen Creation
Mastering the art of Easy Homemade Ice Cream is a rewarding journey for any home cook. With just a few staple ingredients and a bit of patience during the freezing process, you can produce a gourmet dessert that looks as good as it tastes. According to culinary experts, the fat content in heavy cream (typically 36% or higher) is the secret to that “melt-in-your-mouth” sensation.
Whether you are hosting a summer party or looking for a cozy midnight snack, this recipe is a reliable go-to. What flavors are you planning to swirl into your next batch? Reach out and share your favorite combinations!
