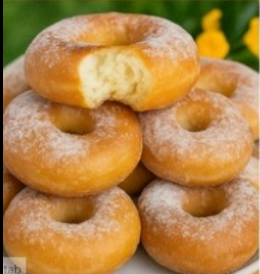
Doughnuts in 15 minutes are the perfect solution for those sudden sweet cravings when you don’t have hours to wait for dough to rise. This rapid method bypasses the traditional yeast process, allowing you to enjoy warm, fluffy treats in record time. It is the ultimate kitchen hack for busy mornings or unexpected guests. 🍩
Table of Contents
Why You Need Doughnuts in 15 Minutes
The traditional art of doughnut making often feels like a weekend-long commitment involving yeast activation, multiple proofing stages, and delicate handling. However, the modern “emergency” version relies on chemical leaveners like baking powder to provide an immediate lift. This means you can go from a bare counter to a plate full of golden-brown goodness without the stress.
Essential Ingredients
- 2 cups All-purpose flour
- 3 tablespoons Granulated sugar
- 1 tablespoon Baking powder
- 1/2 teaspoon Salt
- 3/4 cup Whole milk
- 2 tablespoons Butter (melted)
- 1 large Egg
- 1 teaspoon Vanilla extract
- Vegetable oil (for frying)
- Cinnamon sugar or powdered sugar for coating
| Category | Duration |
| Total Time | 15 Minutes |
| Prep Time | 5 Minutes |
| Cook Time | 8 Minutes |
| Cool Time | 2 Minutes |
Steps to Prepare Your Doughnuts in 15 Minutes
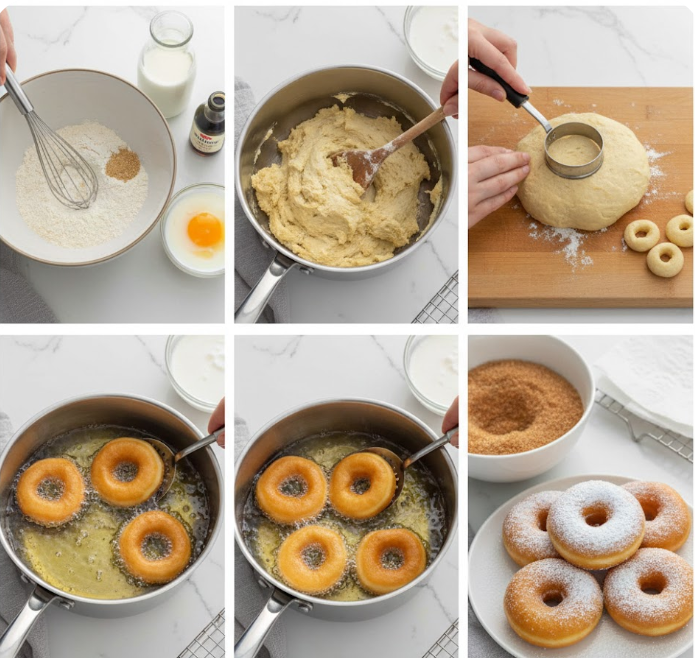
1. Prepare the Dry Base: In a large mixing bowl, whisk together the flour, sugar, baking powder, and salt. Ensure there are no large lumps so the texture remains consistent.
2. Mix the Wet Ingredients: In a separate smaller bowl, whisk the egg, milk, melted butter, and vanilla extract until well combined.
3. Combine and Form the Dough: Pour the wet mixture into the dry ingredients. Stir gently with a wooden spoon until a soft dough forms. Do not overmix, as this can make the texture tough rather than fluffy.
4. Shape the Doughnuts: Turn the dough onto a lightly floured surface. Pat it down to about 1/2-inch thickness. Use a doughnut cutter (or two different-sized circular glasses) to punch out your shapes.
5. Fry to Perfection: Heat 2 inches of oil in a heavy-bottomed pot to 350°F. Carefully drop the dough rings into the hot oil. Fry for about 1 to 2 minutes per side until they are puffed and deep golden brown.
6. Coat and Serve: Use a slotted spoon to remove the treats and place them on paper towels for a few seconds. While still warm, toss them in a bowl of cinnamon sugar or dust them with powdered sugar. ✨
Secrets to Success for Doughnuts in 15 Minutes
The most critical factor in achieving great results with doughnuts in 15 minutes is the oil temperature. If the oil is too cold, the dough will absorb too much fat and become greasy; if it is too hot, the outside will burn before the inside is fully cooked. Using a kitchen thermometer to maintain a steady 350°F is the best way to ensure professional results.
Furthermore, using fresh baking powder is non-negotiable. Since this recipe does not use yeast, the baking powder is the sole source of “spring.” If your powder is older than six months, your doughnuts might turn out dense rather than airy.
Nutrition Facts (Per Serving)
- Calories: 210 kcal
- Total Fat: 9g
- Carbohydrates: 28g
- Protein: 4g
- Sugar: 8g
Serving and Storage Tips
These treats are best enjoyed immediately while the exterior is crisp and the interior is soft. If you have leftovers, store them in an airtight container at room temperature for up to 24 hours. To revive them, a quick 5 to 10-second zap in the microwave will help soften the crumb. ☕
Frequently Asked Questions
Can I bake these instead of frying them?
While you can bake them at 375°F for about 8–10 minutes, the texture will be more like a muffin or a “cake” doughnut rather than the classic fried version.
What is the best oil for frying?
Neutral oils with high smoke points are best. Vegetable oil, canola oil, or peanut oil are all excellent choices that won’t flavor the dough.
Can I add flavors to the dough?
Absolutely! Feel free to add a pinch of nutmeg or lemon zest to the dry ingredients to elevate the flavor profile of your doughnuts in 15 minutes. 😋
Conclusion
Making doughnuts in 15 minutes is a game-changer for anyone who loves home baking but lacks the luxury of time. This recipe proves that you don’t need a bakery or a long list of ingredients to create something truly special and delicious right in your own kitchen.
Whether it’s a rainy afternoon activity with the kids or a quick dessert for a dinner party, these speedy treats never fail to impress. Give this recipe a try today and see just how easy it is to bring the bakery experience home. Did you try a unique glaze or topping? Share your favorite flavor combinations with us!
Would you like me to suggest some easy 3-ingredient glaze recipes to go with these?
