Most of us think boiling eggs is foolproof. After all, what could possibly go wrong with dropping eggs in hot water? Yet countless home cooks make critical mistakes that transform this simple protein into a rubbery, sulfurous disaster—or worse, a potential health hazard.
After years of testing different methods and consulting with culinary experts, I’ve discovered that the way most people boil eggs creates unnecessary problems. From green-tinged yolks to shells that practically weld themselves to the egg white, these common errors waste time, food, and money.
Let me show you exactly which boiling methods to avoid and why they matter more than you think.
Table of Contents
The Cold Water Start Mistake That Ruins Everything
Starting eggs in cold water seems logical, right? Wrong. This widespread method causes the most frustration in kitchens worldwide.
When you place cold eggs directly into cold water and then bring everything to a boil together, you’re asking for trouble. The gradual temperature increase causes the egg whites to bond aggressively with the inner shell membrane. This chemical reaction makes peeling a nightmare, leaving you with cratered, torn egg whites that look like they survived a war zone.
The science behind this is straightforward. As proteins heat slowly, they form stronger bonds with the shell membrane. Fast heating denatures these proteins quickly, preventing the problematic attachment.
Why This Method Fails Consistently
Temperature differential matters enormously. Cold-start boiling takes significantly longer to reach the proper cooking temperature, giving those proteins ample time to create stubborn connections. You’ll spend minutes picking away tiny shell fragments, often removing chunks of egg white with them.
Professional chefs abandoned this method decades ago for good reason.
The Overcooking Trap: When Longer Doesn’t Mean Better
Many people believe that boiling eggs longer guarantees they’re fully cooked. This misconception leads to one of the most common egg-boiling disasters: the dreaded gray-green ring around the yolk.
That discolored ring isn’t just ugly—it’s a chemical reaction between sulfur in the egg white and iron in the yolk. While not harmful, it indicates overcooking and results in a rubbery texture and unpleasant sulfurous smell that makes your kitchen reek.
Overcooking also makes eggs significantly harder to digest. The proteins become so tightly coiled that your digestive enzymes struggle to break them down efficiently.
The Time-Temperature Balance
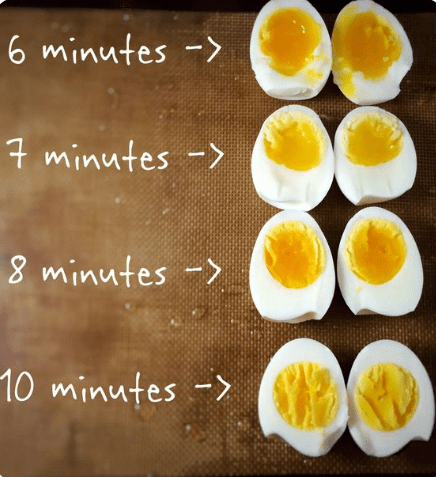
Hard-boiled eggs need exactly 10-12 minutes in boiling water, depending on size. Anything beyond 15 minutes enters overcooking territory. Soft-boiled eggs require just 6-7 minutes for that perfect jammy yolk.
Set a timer. Your nose and taste buds will thank you.
The Shocking Truth About Skipping the Ice Bath
Perhaps the biggest mistake happens after you remove eggs from the boiling water. Letting them cool at room temperature or under lukewarm tap water seems convenient, but it’s a recipe for disappointment.
Without an immediate ice bath, eggs continue cooking internally from residual heat. This carryover cooking pushes them past your desired doneness, turning soft-boiled eggs into hard-boiled ones and hard-boiled eggs into rubbery spheres.
The rapid temperature drop from an ice bath serves another crucial purpose: it causes the egg contents to contract slightly, pulling away from the shell membrane. This single step makes peeling exponentially easier.
How to Create the Perfect Ice Bath
Fill a large bowl with ice and cold water before you start cooking. The moment your timer sounds, immediately transfer eggs to this ice bath using a slotted spoon. Let them sit for at least five minutes—longer for hard-boiled eggs.
This simple step separates amateur egg boilers from experts.
The Fresh Egg Dilemma Nobody Talks About
Here’s something that surprises most people: using the freshest eggs possible actually works against you when boiling.
Farm-fresh eggs have a lower pH level that causes the egg white to adhere stubbornly to the inner membrane. As eggs age, the pH increases slightly, making them easier to peel after boiling. This explains why supermarket eggs (usually 7-10 days old) peel more easily than eggs fresh from your backyard chickens.
If you must use fresh eggs for boiling, you’ll fight with the shells no matter how perfect your technique. Save those ultra-fresh eggs for frying or scrambling, where shell removal isn’t an issue.
The Aging Sweet Spot
Eggs that are 7-14 days old strike the perfect balance. They’re still fresh enough for excellent flavor and nutrition, but old enough that the pH shift has worked its magic on the shell membrane.
Check the date on your carton and plan accordingly.
The Dangerous Cracked Egg Scenario
Boiling cracked eggs presents real health concerns that many people dismiss. When an egg has even a hairline crack, bacteria can enter during the boiling process as pressure builds inside the shell.
The compromised shell also allows egg white to leak out into the boiling water, creating unsightly wisps and an unappetizing appearance. More concerning, the opening provides an entry point for potentially harmful bacteria from the water or cooking surface.
Inspecting Before Cooking
Always examine eggs carefully under good lighting before boiling. Roll them gently on the counter—cracks often reveal themselves through sound or feel. Any egg with visible damage should be reserved for dishes where you’ll crack it directly into a pan and cook it thoroughly.
Your health isn’t worth the risk of using questionable eggs.
The Salt and Vinegar Myth That Needs to Die
Walk into any kitchen, and someone will tell you to add salt or vinegar to your boiling water. They’ll claim it prevents cracking, makes peeling easier, or improves flavor. The truth? These additions do virtually nothing beneficial and can actually cause problems.
Salt does not prevent shells from cracking—the structural integrity of the shell depends on how you handle eggs and control temperature changes, not on water salinity. Vinegar can help seal small leaks if a crack does occur, but it won’t prevent cracking in the first place.
Some evidence suggests that salt can actually make eggs slightly harder to peel by affecting protein structure in unexpected ways.
What Actually Works Instead
Skip the additives entirely. Focus on proper temperature control, using older eggs, and implementing that crucial ice bath. These factors matter infinitely more than whatever you dissolve in the water.
Save your salt and vinegar for the finished eggs, where they actually enhance flavor.
The Rolling Boil Intensity Problem
Many cooks believe that maintaining a vigorous, rolling boil ensures thorough cooking. In reality, this aggressive bubbling creates another set of problems entirely.
Intense boiling causes eggs to bounce and crash against each other and the pot walls, significantly increasing the likelihood of cracks. These impacts can compromise shells that were perfectly intact at the start of cooking.
The violent water movement also leads to uneven cooking. Eggs tumbling chaotically experience inconsistent heat exposure, resulting in some portions overcooked while others remain underdone.
The Gentle Simmer Solution
Once water reaches a boil, immediately reduce heat to maintain a gentle simmer. You want small bubbles breaking the surface, not a volcanic eruption. This gentler approach cooks eggs evenly while protecting shells from damage.
Your eggs will emerge with better texture and appearance—guaranteed.
The Altitude Factor Most People Ignore
If you live at high elevation, standard boiling times simply don’t work. Water boils at lower temperatures as altitude increases, meaning your eggs cook more slowly than recipes assume.
At 5,000 feet elevation, water boils at about 203°F instead of 212°F. This nine-degree difference significantly impacts cooking time. Using sea-level timing at high altitude results in undercooked eggs with runny whites and unsafe-to-eat centers.
Adjusting for Your Location
Add approximately one minute of cooking time for every 1,000 feet above sea level. If you’re at 6,000 feet, add six minutes to standard cooking times. This might require some experimentation to dial in perfect results for your specific elevation.
Don’t assume recipes account for altitude—most don’t.
The Reheating Disaster Waiting to Happen
Boiling eggs specifically to reheat later creates texture and safety issues that most people don’t anticipate. While properly refrigerated hard-boiled eggs last about one week, reheating them presents unique challenges.
Microwaving boiled eggs can cause them to explode due to rapid steam buildup inside the egg. Even if they don’t explode, the microwave creates hot spots that make some bites scalding while others remain cold.
Reboiling previously cooked eggs turns them into rubber. The proteins, already denatured and coagulated, tighten further with additional heat, squeezing out moisture and creating an unpleasant, chalky texture.
Safe Reheating Methods
If you must reheat boiled eggs, place them in a bowl of hot (not boiling) water for 10 minutes. This gently warms them through without overcooking. Alternatively, slice them and reheat briefly in a covered pan with a little water to create steam.
Better yet, plan to eat boiled eggs cold or at room temperature where they’re naturally delicious.
The Proper Method That Actually Works
After exposing all these mistakes, you deserve to know the right approach. This method produces consistently perfect boiled eggs with easy-to-remove shells and ideal texture every single time.
Bring a pot of water to a rolling boil first. While waiting, prepare your ice bath in a separate bowl. Once the water boils vigorously, use a slotted spoon to gently lower room-temperature eggs into the water. Reduce heat immediately to maintain a gentle simmer.
Set your timer based on desired doneness: 6-7 minutes for soft-boiled, 10-12 minutes for hard-boiled. When the timer sounds, immediately transfer eggs to the ice bath and let them sit for at least five minutes.
The Peeling Technique That Completes the Process
After the ice bath, gently tap each egg all over to create a network of cracks. Roll it lightly on the counter to further break the shell. Starting at the wider end where the air pocket sits, peel under cold running water. The water helps separate stubborn membrane bits and rinses away shell fragments.
This combination of proper cooking and peeling technique delivers reliably beautiful results.
Why These Mistakes Matter More Than You Think
Beyond aesthetics and convenience, improper egg-boiling methods impact nutrition and food safety. Overcooked eggs have reduced bioavailability of certain nutrients, meaning your body can’t absorb them as efficiently.
The sulfur compounds created by overcooking aren’t just smelly—they indicate chemical changes that make proteins less digestible. If you’re eating eggs for their protein benefits, overcooking partially defeats that purpose.
From a food safety perspective, undercooked eggs pose salmonella risks, while cracked eggs during boiling can harbor bacterial contamination. Getting the method right isn’t just about making breakfast more pleasant—it’s about protecting your health and maximizing nutritional value.
The Economic Impact
Consider this: every ruined batch of eggs represents wasted money and food. If you’re throwing away even one or two mangled eggs per week because you couldn’t peel them properly, that’s 50-100 eggs annually ending up in the trash.
At current prices, that’s a meaningful amount of money literally going down the garbage disposal.
Final Thoughts on Perfecting This Essential Skill
Boiling eggs properly requires understanding the science behind what’s happening inside that shell. Temperature control, timing, and post-cooking treatment all play crucial roles in achieving the results you want.
The methods to avoid—cold water starts, overcooking, skipping the ice bath, using too-fresh eggs, boiling cracked eggs, aggressive boiling, and improper reheating—represent the most common paths to disappointing results. Each mistake compounds the others, turning simple egg boiling into a frustrating ordeal.
Master the proper technique once, and you’ll have perfect boiled eggs whenever you want them. Your breakfast, salads, and snacks will improve dramatically, and you’ll never again struggle with stubborn shells or rubbery, sulfurous eggs.
The investment of a few minutes to learn correct method pays dividends for years to come. After all, we’re talking about one of nature’s most perfect, affordable, and nutritious foods—it deserves to be prepared properly.
