Dessert made in a blender is the perfect solution for anyone who wants a gourmet treat without spending hours in the kitchen or washing a dozen different bowls. This specific recipe combines a silky, mousse-like base with crunchy chocolate bits for a sophisticated finish. It is truly the ultimate “no-fuss” sweet fix for busy weeknights or unexpected guests. 🍦
Table of Contents
Why You Should Try This Dessert Made in a Blender
The magic of a dessert made in a blender lies in the aeration. When you whirl heavy cream and condensed milk at high speeds, you incorporate tiny air bubbles that create a light, cloud-like texture that is difficult to achieve by hand. Unlike traditional stovetop puddings, there is no risk of scorching the milk or dealing with lumps. You simply pour, pulse, and chill.
Ingredients
- 2 cups heavy whipping cream (well-chilled)
- 1 can (14 oz) sweetened condensed milk
- 1 cup whole milk
- 1 tablespoon pure vanilla extract
- 1/2 cup high-quality dark chocolate chips or shaved chocolate bar
- A pinch of sea salt (to balance the sweetness)
Cooking Overview
| Category | Duration |
| Total Time | 4 hours 10 minutes |
| Prep Time | 10 minutes |
| Cook Time | 0 minutes |
| Cool Time | 4 hours |
Preparation Steps
Step 1: Place your blender jar in the refrigerator for 15 minutes before starting. Having a cold environment helps the cream thicken much faster during the blending process.
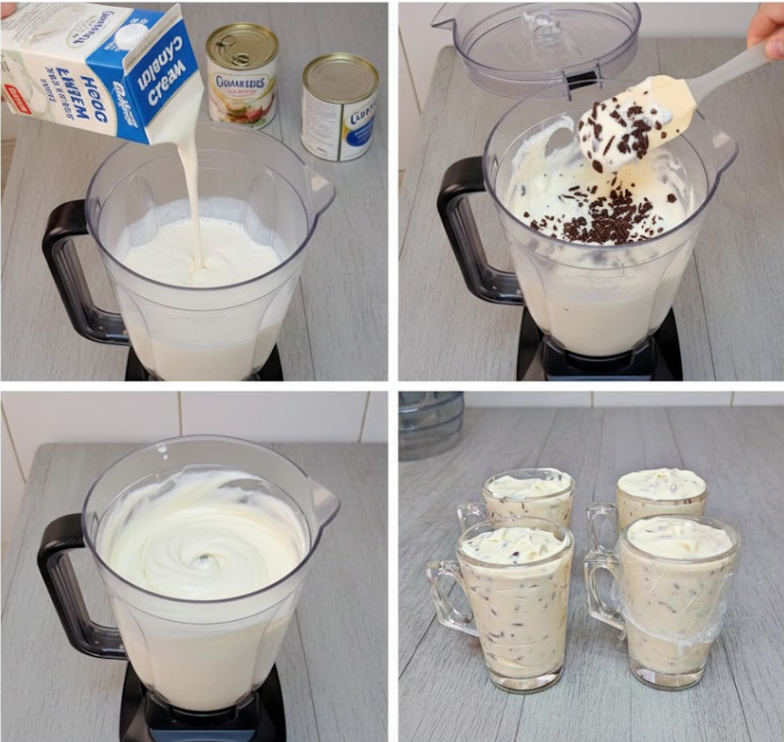
Step 2: Pour the chilled heavy whipping cream, sweetened condensed milk, whole milk, vanilla extract, and sea salt into the blender.
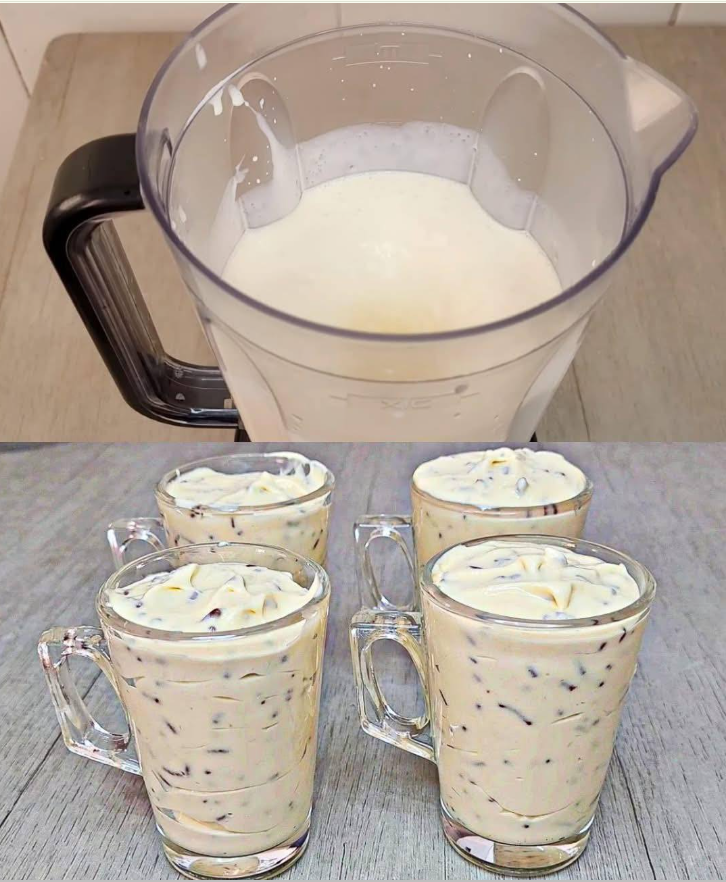
Step 3: Secure the lid and blend on medium-high speed for about 1 to 2 minutes. You are looking for the mixture to thicken significantly until it reaches a consistency similar to soft-serve ice cream. Be careful not to over-blend into butter!
Step 4: Remove the lid and add the chocolate chips or shavings. Use a spatula to gently fold them in by hand so they stay intact and provide a nice texture.
Step 5: Pour the mixture into individual glass cups or a large serving bowl. Smooth the tops with the back of a spoon to create those signature swirls. 🍫
Step 6: Cover the containers with plastic wrap and refrigerate for at least 4 hours. This “cool time” is essential for the dessert to set firmly.
The Benefits of a Dessert Made in a Blender
One of the primary benefits of this method is consistency. Because the blades move so rapidly, the emulsification of the fats and sugars is nearly perfect. Additionally, this dessert made in a blender is highly customizable; you can swap the vanilla for peppermint extract or add a shot of espresso for a mocha version. It is a versatile base that works for almost any flavor profile you enjoy.
Nutrition Facts
Per serving (based on 6 servings):
- Calories: 340 kcal
- Total Fat: 22g
- Sugars: 28g
- Protein: 5g
- Calcium: 15% DV
Serving and Storage Tips
To serve, top each cup with an extra dusting of cocoa powder or a fresh mint leaf for a pop of color. If you want to get fancy, a drizzle of salted caramel works wonders.
For storage, keep the dessert in an airtight container in the back of the refrigerator (the coldest part). It will stay fresh and delicious for up to 3 days. If you prefer a firmer, ice-cream-like texture, you can actually pop these into the freezer for 2 hours before serving.
Frequently Asked Questions
Can I use low-fat milk for this recipe?
While you can use low-fat milk for the “whole milk” portion, the heavy whipping cream is non-negotiable. The high fat content is what allows the dessert to thicken and hold its shape.
Why is my dessert still liquid after blending?
Ensure your ingredients were very cold before starting. If the cream is warm, it won’t trap air properly. Also, make sure you blend long enough to see the mixture “climb” the sides of the blender jar.
Can I add fruit to this mix?
Absolutely! Folding in fresh raspberries or chopped strawberries at the end is a fantastic way to add a tart contrast to the sweet cream base. 🍓
The beauty of a dessert made in a blender is that it proves you don’t need professional pastry skills to create something memorable. With just a few pantry staples and a single appliance, you can whip up a treat that looks and tastes like it came from a high-end bistro. It is the ultimate shortcut for the modern home cook.
Have you tried making sweets in your blender before? Let us know which toppings you decided to add to your masterpiece! Would you like me to suggest some alternative flavor combinations like lemon zest or peanut butter?
