There’s something absolutely magical about biting into a warm, cheesy wrap that’s bursting with garlic-infused chicken and melted cheese. If you’ve ever craved comfort food that’s both satisfying and easy to make, this Cheesy Garlic Chicken Wrap is about to become your new favorite recipe.
Wraps have been a beloved meal option across cultures for centuries—from Middle Eastern shawarma to Mexican burritos. This particular recipe draws inspiration from the American love affair with garlic bread and chicken wraps, combining two comfort food favorites into one incredible handheld meal. The beauty of this chicken wrap lies in its versatility and the irresistible combination of creamy, garlicky goodness wrapped in a soft tortilla.
This recipe is perfect for busy weeknight dinners, meal prep enthusiasts, college students, or anyone who wants a restaurant-quality meal without the hassle. Whether you’re feeding a hungry family or just treating yourself to something delicious, this Cheesy Garlic Chicken Wrap delivers on flavor, texture, and pure satisfaction. The best part? You can have it ready in about 30 minutes from start to finish, making it ideal for those days when you want something homemade but don’t have hours to spend in the kitchen.
Table of Contents
Ingredients for Your Perfect Cheesy Garlic Chicken Wrap
For the Garlic Chicken:
- 1 pound (450g) boneless, skinless chicken breast, cut into bite-sized pieces
- 4 cloves fresh garlic, minced (or 1 tablespoon garlic paste)
- 2 tablespoons olive oil
- 1 teaspoon paprika
- 1 teaspoon dried oregano
- ½ teaspoon black pepper
- 1 teaspoon salt (adjust to taste)
- ½ teaspoon onion powder
- ¼ teaspoon red pepper flakes (optional, for a subtle kick)
For the Garlic Sauce:
- ¼ cup mayonnaise (use vegan mayo for a lighter option)
- 2 tablespoons plain yogurt or sour cream
- 2 cloves garlic, minced
- 1 tablespoon lemon juice
- ½ teaspoon dried parsley
- Pinch of salt
For Assembly:
- 4 large flour tortillas (10-inch size works best)
- 1½ cups shredded mozzarella cheese (or a blend of mozzarella and cheddar)
- 1 cup iceberg lettuce, shredded
- 1 large tomato, diced
- ¼ red onion, thinly sliced (optional)
- 2 tablespoons butter, melted (for toasting the wraps)
Substitution Notes: You can use chicken thighs instead of breast for juicier meat. Greek yogurt works perfectly in place of sour cream. If you’re dairy-free, use plant-based cheese alternatives. Whole wheat or spinach tortillas make great healthier alternatives to regular flour tortillas.
Step-by-Step Instructions for Making This Delicious Chicken Wrap
Step 1: Prepare Your Garlic Sauce
Start by whisking together all the garlic sauce ingredients in a small bowl. Combine the mayonnaise, yogurt, minced garlic, lemon juice, parsley, and a pinch of salt until smooth and creamy. Set this aside in the refrigerator while you prepare the chicken—this allows the flavors to meld beautifully. Trust me, this sauce is the secret weapon that takes your Cheesy Garlic Chicken Wrap from good to absolutely incredible.
Step 2: Season and Cook the Chicken
Pat your chicken pieces dry with paper towels—this helps them brown better. In a mixing bowl, combine the chicken with minced garlic, paprika, oregano, black pepper, salt, onion powder, and red pepper flakes if using. Mix everything thoroughly so each piece is well-coated with the aromatic seasonings.
Heat the olive oil in a large skillet over medium-high heat. Once the oil is shimmering, add your seasoned chicken pieces in a single layer. Don’t overcrowd the pan—work in batches if necessary. Cook for about 6-7 minutes, stirring occasionally, until the chicken is golden brown on the outside and cooked through (internal temperature should reach 165°F/74°C). The garlic will become fragrant and absolutely mouthwatering. Remove from heat and set aside.
Step 3: Warm Your Tortillas
This step is crucial for the perfect wrap! You want pliable tortillas that won’t crack when you fold them. Heat a clean, dry skillet over medium heat and warm each tortilla for about 20-30 seconds per side. Alternatively, you can wrap them in a damp paper towel and microwave for 15-20 seconds. Keep them wrapped in a kitchen towel to stay warm.
Step 4: Assemble Your Wraps
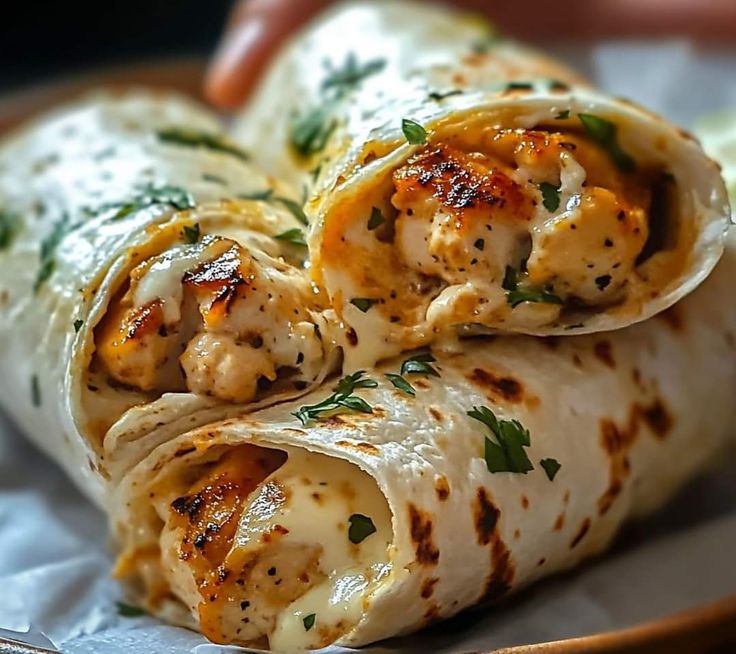
Now comes the fun part! Lay a warm tortilla on a clean surface. Spread about 2 tablespoons of your homemade garlic sauce down the center of the tortilla, leaving about 2 inches from the edges. Layer on a generous portion of the cooked garlic chicken (about ¾ cup), followed by a handful of shredded cheese, fresh lettuce, diced tomatoes, and red onion if you’re using it.
Step 5: The Perfect Wrap Technique
Here’s how to wrap like a pro: Fold in the sides of the tortilla (left and right) about 1-2 inches toward the center. Then, starting from the bottom edge closest to you, tightly roll the tortilla up and away from you, keeping the sides tucked in as you go. The key is to keep everything tight so your filling doesn’t escape. Place the wrap seam-side down.
Step 6: Toast for Extra Deliciousness
This final step transforms your wrap from ordinary to extraordinary! Brush the outside of your assembled wrap lightly with melted butter. Heat a clean skillet or griddle over medium heat and place your wrap seam-side down first. Press gently with a spatula and cook for 2-3 minutes until golden and crispy. Carefully flip and cook the other side for another 2-3 minutes. The cheese inside will melt, and the tortilla will develop a beautiful golden crust that adds incredible texture to every bite.
Step 7: Serve and Enjoy
Remove your Cheesy Garlic Chicken Wrap from the heat and let it rest for about a minute before cutting. Use a sharp serrated knife to cut it in half at a diagonal—this makes for a prettier presentation and easier eating. Serve immediately while the cheese is still gooey and the wrap is warm.
Pro Tips & Variations to Customize Your Chicken Wrap
Spice It Up: Love heat? Add sliced jalapeños to your wrap, increase the red pepper flakes in the chicken seasoning, or drizzle some hot sauce over the filling before wrapping. You can also mix a teaspoon of sriracha or your favorite hot sauce into the garlic sauce.
Make It Healthier: Use grilled chicken breast instead of pan-fried, swap regular mayo for Greek yogurt-based mayo, add more vegetables like bell peppers, cucumbers, or shredded carrots, and opt for whole wheat tortillas. You can also reduce the cheese slightly and increase the fresh vegetables for a lighter version.
Mediterranean Twist: Add some sliced black olives, a sprinkle of feta cheese along with the mozzarella, and include fresh cucumber slices. You can also add a bit of dried mint to the garlic sauce for an authentic Mediterranean flavor.
Ranch Lover’s Version: Mix ranch seasoning into the garlic sauce or use ranch dressing instead of the garlic sauce altogether. Add crispy turkey bacon bits for extra flavor (ensure it’s halal-certified).
Meal Prep Magic: Cook a large batch of the garlic chicken at the beginning of the week and store it in the refrigerator. When you’re ready to eat, simply reheat the chicken and assemble fresh wraps in minutes. This saves tons of time on busy weekdays.
Crispy Chicken Alternative: If you have leftover breaded chicken tenders (ensure they’re prepared according to halal guidelines), slice them up and use them in place of the sautéed chicken for a different texture and flavor profile.
Cheese Choices: Experiment with different cheese combinations! Try pepper jack for spice, Swiss for a milder flavor, or a Mexican cheese blend for a Southwestern vibe. Just make sure any cheese you use is halal-certified if that’s important to you.
Storage & Reheating Tips for Your Cheesy Garlic Chicken Wrap
Storing Components Separately: For best results, store the cooked chicken, garlic sauce, and fresh vegetables separately in airtight containers in the refrigerator. The chicken will keep for 3-4 days, and you can assemble fresh wraps as needed. This prevents the tortilla from getting soggy.
Storing Assembled Wraps: If you’ve already assembled the wraps, wrap them tightly in aluminum foil or plastic wrap and refrigerate for up to 24 hours. Keep in mind that the tortilla may become slightly softer, but they’ll still taste delicious.
Freezing: While I don’t recommend freezing fully assembled wraps with fresh vegetables, you can absolutely freeze the cooked, seasoned chicken for up to 3 months. Thaw overnight in the refrigerator before reheating. Make the garlic sauce fresh when you’re ready to assemble.
Reheating Assembled Wraps: The best method is to unwrap the refrigerated wrap, place it on a skillet over medium-low heat, and warm for about 3-4 minutes per side until heated through and the outside is crispy again. You can also reheat in a 350°F (175°C) oven wrapped in foil for about 15 minutes.
Reheating Chicken Only: Place the chicken in a microwave-safe dish with a splash of water or chicken broth, cover, and microwave in 30-second intervals until heated through. Alternatively, reheat in a skillet over medium heat with a tiny bit of oil or butter.
Frequently Asked Questions About This Cheesy Garlic Chicken Wrap
Can I Make This Cheesy Garlic Chicken Wrap Ahead of Time?
Absolutely! In fact, this recipe is fantastic for meal prep. Cook the garlic chicken and prepare the sauce up to 3 days in advance, storing them separately in the refrigerator. When you’re ready to eat, simply reheat the chicken and assemble fresh wraps. This way, your tortillas stay soft and fresh, and your vegetables remain crisp. For the best results, avoid assembling the complete wrap more than a day ahead, as the moisture from the sauce and vegetables can make the tortilla soggy.
Can I Use Rotisserie Chicken for This Recipe?
Yes, rotisserie chicken is a fantastic shortcut! Just shred or dice about 2 cups of cooked rotisserie chicken and toss it in a skillet with the garlic and seasonings for about 3-4 minutes to infuse the flavors. This can cut your cooking time down to just 15 minutes, making this already quick recipe even faster. Make sure to use halal-certified rotisserie chicken if you’re following halal dietary guidelines.
What’s the Best Way to Prevent My Wrap from Falling Apart?
The secret to a wrap that holds together perfectly is threefold: First, don’t overfill your tortilla—less is more when it comes to preventing spills. Second, make sure to tuck those sides in tightly before rolling. Third, toast the assembled wrap seam-side down first, which helps seal everything together. Also, letting the wrap rest for about a minute after toasting helps the melted cheese set slightly, acting like delicious glue that holds everything in place.
Can I Make a Vegetarian Version of This Recipe?
Definitely! For a vegetarian chicken wrap, substitute the chicken with seasoned chickpeas, grilled halloumi cheese, or crispy tofu. Season your protein alternative with the same garlic and spice blend for consistent flavor. You can also add roasted vegetables like bell peppers, zucchini, and eggplant for a hearty, satisfying vegetarian wrap that’s just as delicious as the original.
How Can I Make This Wrap Less Messy to Eat?
To minimize mess, cut your vegetables into smaller, more uniform pieces so they distribute evenly throughout the wrap. Don’t overload on wet ingredients like tomatoes and sauce—a little goes a long way. Wrap your finished product in parchment paper or foil, leaving one end open, and peel back the wrapper as you eat. This classic wrap technique is what you see at restaurants and sandwich shops, and it keeps everything contained beautifully.
Nutritional Information (Approximate per Serving)
Serving Size: 1 wrap
- Calories: 520
- Protein: 35g
- Carbohydrates: 38g
- Dietary Fiber: 3g
- Sugars: 3g
- Fat: 24g
- Saturated Fat: 8g
- Cholesterol: 95mg
- Sodium: 980mg
- Calcium: 285mg
- Iron: 3mg
Note: Nutritional values are approximate and will vary based on specific brands and ingredients used. For a lower-calorie version, use whole wheat tortillas, reduce cheese, and opt for Greek yogurt instead of mayonnaise in the sauce.
Recipe Card: Cheesy Garlic Chicken Wrap
Recipe Title: Cheesy Garlic Chicken Wrap
Prep Time: 15 minutes
Cook Time: 15 minutes
Total Time: 30 minutes
Servings: 4 wraps
Ingredients:
For the Chicken:
- 1 pound boneless, skinless chicken breast, cubed
- 4 cloves garlic, minced
- 2 tablespoons olive oil
- 1 teaspoon paprika
- 1 teaspoon dried oregano
- ½ teaspoon black pepper
- 1 teaspoon salt
- ½ teaspoon onion powder
For the Garlic Sauce:
- ¼ cup mayonnaise
- 2 tablespoons plain yogurt
- 2 cloves garlic, minced
- 1 tablespoon lemon juice
- ½ teaspoon dried parsley
- Pinch of salt
For Assembly:
- 4 large flour tortillas
- 1½ cups shredded mozzarella cheese
- 1 cup shredded lettuce
- 1 large tomato, diced
- ¼ red onion, sliced (optional)
- 2 tablespoons butter, melted
Instructions:
- Make the garlic sauce by combining mayonnaise, yogurt, garlic, lemon juice, parsley, and salt. Refrigerate until ready to use.
- Season chicken pieces with garlic, paprika, oregano, black pepper, salt, and onion powder.
- Heat olive oil in a large skillet over medium-high heat. Cook chicken for 6-7 minutes until golden brown and cooked through.
- Warm tortillas in a dry skillet for 20-30 seconds per side or microwave wrapped in a damp paper towel.
- Spread 2 tablespoons garlic sauce down the center of each tortilla. Layer with chicken, cheese, lettuce, tomato, and onion.
- Fold in the sides of the tortilla, then roll tightly from the bottom up, keeping sides tucked.
- Brush the outside with melted butter and toast in a skillet over medium heat for 2-3 minutes per side until golden and the cheese melts.
- Let rest for 1 minute, then cut in half diagonally and serve immediately.
Notes:
- Make sure all ingredients are halal-certified if following halal dietary guidelines
- For meal prep, store chicken and sauce separately and assemble fresh
- Customize with your favorite vegetables and cheese varieties
- The garlic sauce can be made up to 3 days in advance
Final Thoughts on This Amazing Cheesy Garlic Chicken Wrap
This Cheesy Garlic Chicken Wrap is more than just a quick meal—it’s a celebration of flavors that come together in perfect harmony. The tender, garlicky chicken paired with melted cheese, fresh vegetables, and that incredible homemade garlic sauce creates a taste experience that rivals any restaurant version. Plus, with its simple preparation and endless customization options, this chicken wrap is sure to become a regular in your meal rotation.
Whether you’re packing lunch for work, feeding hungry teenagers after school, hosting a casual dinner with friends, or just craving something comforting and delicious, this recipe has you covered. The best part is knowing exactly what goes into your food—no mystery ingredients, no preservatives, just wholesome, flavorful ingredients prepared with love.
We’d love to hear from you! Have you tried this Cheesy Garlic Chicken Wrap recipe? Did you add your own special twist? Share your cooking experiences, photos, and creative variations in the comments below. Your feedback helps us create even better recipes for our community. If you enjoyed this recipe, please share it with your friends and family on social media—because great food is meant to be shared! Happy cooking, and may your kitchen always be filled with the irresistible aroma of garlic and melted cheese! 🌯🍗
