I learned how to make this bread that rises a lot and is very fluffy, and it completely changed my relationship with baking. For years, I struggled with dense, disappointing loaves that never quite matched the bakery-quality bread I craved. Then I discovered the techniques and secrets that professional bakers use, and suddenly, everything clicked.
Today, I’m sharing everything I’ve learned about creating bread that rises beautifully, develops an airy crumb, and tastes absolutely incredible. Whether you’re a complete beginner or someone who’s had their share of bread-baking failures, this guide will walk you through exactly how to achieve that perfect, fluffy texture every single time.
Why Most Homemade Bread Doesn’t Rise Properly
Before we get into the winning formula, let’s talk about why so many home bakers struggle with bread that doesn’t rise. Understanding what goes wrong is the first step toward getting it right.
The Yeast Factor
Dead or inactive yeast is the number one culprit behind flat bread. Yeast is a living organism, and if it’s expired, stored improperly, or activated in water that’s too hot or too cold, it simply won’t do its job.
Insufficient Kneading
Kneading develops gluten, the protein structure that traps the gas produced by yeast. Without proper gluten development, your bread can’t hold onto the air bubbles that make it rise and stay fluffy.
Impatience with Rising Time
Bread needs time. Rushing the rising process means the yeast hasn’t had enough time to produce the carbon dioxide that creates those beautiful air pockets throughout your loaf.
Wrong Flour Choice
Not all flour is created equal. The protein content in your flour directly affects how much your bread can rise and how fluffy the final texture will be.
The Secret Recipe for Bread That Rises a Lot and Is Very Fluffy
Now, let’s get to the good stuff—the actual recipe that changed everything for me.
Ingredients You’ll Need
For the Dough:
- 4 cups bread flour (plus extra for dusting)
- 2 tablespoons sugar
- 2 teaspoons salt
- 2 and 1/4 teaspoons active dry yeast (one standard packet)
- 1 and 1/2 cups warm milk (110°F/43°C)
- 3 tablespoons butter, softened
- 1 large egg, room temperature
For Brushing:
- 2 tablespoons melted butter
- Optional: 1 egg beaten with 1 tablespoon milk for egg wash
Step-by-Step Instructions
Activating Your Yeast the Right Way
This step is crucial, and it’s where many bakers go wrong. Pour your warm milk into a large mixing bowl. The temperature is critical—too hot kills the yeast, too cold leaves it dormant. It should feel like warm bathwater on your wrist.
Add the sugar to the milk and stir to dissolve. Sprinkle the yeast over the surface and give it a gentle stir. Let this mixture sit for 5-10 minutes until it becomes foamy and smells slightly yeasty. This foam is proof your yeast is alive and ready to work its magic.
If your mixture doesn’t foam, your yeast is dead or your milk was the wrong temperature. Don’t proceed—start over with fresh yeast and properly warmed milk.
Mixing Your Dough
Once your yeast is activated and foamy, add the softened butter and egg to the mixture. Whisk these together until combined.
In a separate large bowl, whisk together the flour and salt. This step is important because adding salt directly to yeast can inhibit its activity.
Create a well in the center of your flour mixture and pour in the wet ingredients. Using a wooden spoon or your hands, mix everything together until a shaggy dough forms. At this point, it will look messy and rough—that’s exactly right.
The Kneading Process That Changes Everything
Turn your dough out onto a lightly floured surface. Here’s where the real magic happens, and I’m going to share the technique that finally made bread-making click for me.
Knead the dough by pushing it away from you with the heels of your hands, then folding it back over itself and giving it a quarter turn. Repeat this motion for 10-12 minutes. Yes, it’s a workout, and yes, it’s worth it.
How do you know when you’ve kneaded enough? The dough should transform from rough and sticky to smooth and elastic. Perform the windowpane test: pinch off a small piece of dough and gently stretch it between your fingers. If you can stretch it thin enough to see light through it without it tearing, your gluten is properly developed.
If you’re using a stand mixer with a dough hook, knead on medium speed for 8-10 minutes. The dough should pull away from the sides of the bowl and become smooth.
The First Rise: Where Patience Pays Off
Shape your kneaded dough into a smooth ball. Lightly oil a large bowl and place the dough inside, turning it once to coat all sides with oil. This prevents a dry skin from forming.
Cover the bowl tightly with plastic wrap or a damp kitchen towel. Place it in a warm, draft-free location. I use my oven with just the light on—it creates the perfect warm environment.
Let the dough rise until it doubles in size. Depending on the temperature of your kitchen, this takes anywhere from 1 to 2 hours. Don’t watch the clock—watch the dough. It should look puffy and feel light when you gently press it.
Shaping for Maximum Fluffiness
Once your dough has doubled, punch it down gently to release the gas. Turn it out onto a lightly floured surface.
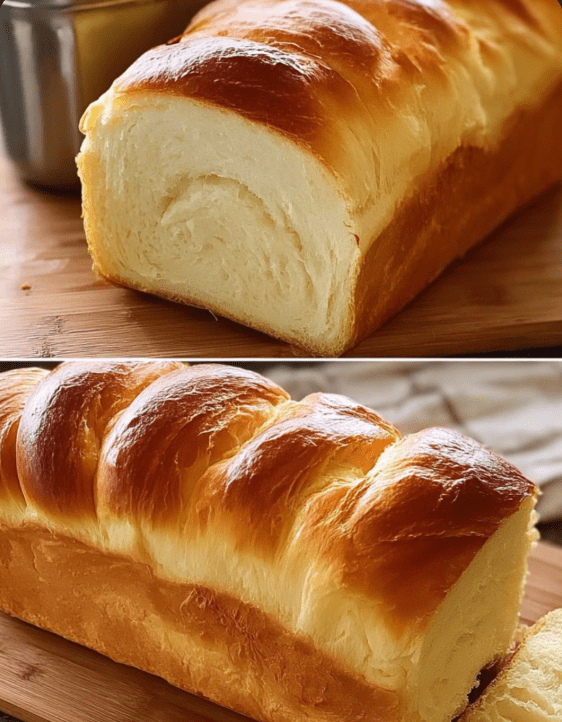
Here’s a shaping technique that creates incredible texture: flatten the dough into a large rectangle, roughly 9 inches by 12 inches. Starting from a short end, roll the dough tightly into a log, pinching the seam closed as you go.
Place the shaped dough seam-side down into a greased 9×5-inch loaf pan. Alternatively, you can divide the dough into rolls or shape it into a round boule for baking on a sheet pan.
The Second Rise: Building Even More Flavor
Cover your shaped dough loosely with a kitchen towel and let it rise again until it nearly doubles in size—about 45-60 minutes. For a loaf pan, the dough should dome about 1 inch above the rim of the pan.
This second rise is what separates good bread from extraordinary bread. The yeast continues to create flavor compounds while building that airy structure.
Baking to Golden Perfection
While your dough completes its second rise, preheat your oven to 375°F (190°C). Position your oven rack in the lower third of the oven.
If you want a shiny, golden crust, brush the top of your loaf with the egg wash right before baking. For a softer crust, skip the egg wash and brush with melted butter instead.
Bake for 30-35 minutes, until the top is deep golden brown and the bread sounds hollow when tapped on the bottom. An instant-read thermometer inserted into the center should read 190-200°F (88-93°C).
Remove the bread from the oven and immediately brush the top with melted butter. This creates an incredibly soft, flavorful crust.
Let the bread cool in the pan for 10 minutes, then turn it out onto a wire rack. I know it’s tempting, but resist slicing into it for at least 30 minutes. Cutting hot bread releases all the steam that’s still cooking the interior, and you’ll end up with a gummy texture.
The Science Behind Bread That Rises a Lot
Understanding the science helps you troubleshoot problems and even improvise when needed.
How Yeast Creates Rise
Yeast feeds on the sugars in flour and produces carbon dioxide gas and alcohol as byproducts. This gas gets trapped in the gluten network you created through kneading, causing the dough to expand and rise.
The alcohol evaporates during baking, contributing to bread’s distinctive aroma and flavor.
The Role of Gluten
Gluten is formed when two proteins in flour—glutenin and gliadin—combine with water and are worked through kneading. This creates stretchy, elastic strands that trap gas bubbles, allowing your bread to rise and maintain its structure.
Bread flour contains more protein (12-14%) than all-purpose flour (10-12%), which means it can develop more gluten and create a higher, fluffier rise.
Why Temperature Matters
Yeast is most active between 75-85°F (24-29°C). Too cold, and it works sluggishly. Above 140°F (60°C), you’ll kill it entirely. This is why temperature control during activation and rising is so important.
Pro Tips for the Fluffiest Bread Every Time
After making this bread dozens of times, I’ve picked up some tricks that consistently produce exceptional results.
Use Bread Flour, Not All-Purpose
I cannot stress this enough. The higher protein content in bread flour creates stronger gluten development, which means better rise and fluffier texture. It’s worth buying a bag specifically for bread baking.
Measure Flour Correctly
Too much flour is the most common measuring mistake in baking. The best method is weighing flour on a kitchen scale (4 cups = approximately 480 grams).
If you’re using measuring cups, use the spoon-and-level method: spoon flour into your measuring cup and level it off with a knife. Never scoop directly from the bag, which compacts the flour and gives you too much.
Create a Warm Rising Environment
In cold weather, I fill a large pan with boiling water and place it on the bottom rack of my oven. The dough goes on the rack above with just the oven light on. This creates a warm, humid environment perfect for rising.
Don’t Skip the Second Rise
I know you’re excited to bake, but that second rise is crucial for developing flavor and creating the most tender crumb. Plan your time accordingly.
Steam for a Better Crust
Professional bakeries inject steam into their ovens. You can mimic this by placing a metal pan on the bottom rack of your oven during preheating. When you put your bread in, carefully pour a cup of hot water into the pan. The steam helps the bread expand fully before the crust sets.
Variations and Flavor Additions
Once you’ve mastered the basic recipe, the world of bread-making opens up.
Herb and Garlic Bread
Add 2 tablespoons of dried Italian herbs and 3 cloves of minced garlic to your dough during mixing. The aroma as this bakes is absolutely intoxicating.
Honey Wheat Bread
Replace 1 cup of bread flour with whole wheat flour and substitute honey for the sugar. This creates a slightly denser but incredibly flavorful loaf.
Cinnamon Swirl Bread
Before shaping your dough, roll it into a rectangle and sprinkle with a mixture of cinnamon and sugar. Roll tightly and bake as directed. Perfect for breakfast toast.
Dinner Rolls
Instead of shaping into a loaf, divide the dough into 12-15 equal pieces, shape into balls, and place in a greased 9×13-inch pan. They’ll bake together and pull apart into soft, fluffy rolls.
Troubleshooting Common Problems
Even with the best recipe, things can occasionally go wrong. Here’s how to fix the most common issues.
My Bread Didn’t Rise
Check your yeast expiration date. Activate your yeast in water that’s the right temperature (110°F/43°C). Make sure your rising location is warm enough.
The Bread Rose But Then Collapsed
This usually means the dough over-proofed (rose too long). The gluten structure became too weak to support the gas bubbles. Next time, don’t let it rise quite as long.
The Texture Is Dense Instead of Fluffy
You either didn’t knead long enough to develop gluten, didn’t let it rise long enough, or used old/dead yeast. Make sure you’re kneading until the windowpane test passes.
The Crust Is Too Hard
Your oven temperature may be too high, or you baked it too long. Use an oven thermometer to check accuracy. Also, brushing with butter after baking helps soften the crust.
The Bottom Is Undercooked
Your oven rack was positioned too high. Bread needs to bake in the lower third of the oven where heat is more intense.
Storing Your Fluffy Bread
Proper storage keeps your bread fresh and maintains that wonderful texture.
Room Temperature Storage
Once completely cooled, wrap your bread in plastic wrap or store in a bread box. It will stay fresh for 3-4 days at room temperature.
Never refrigerate bread—it accelerates staling through a process called retrogradation, where starch molecules crystallize.
Freezing for Long-Term Storage
This bread freezes beautifully. Once cooled, wrap tightly in plastic wrap, then aluminum foil. Freeze for up to 3 months.
To thaw, leave it wrapped at room temperature for several hours. For sliced bread, you can toast slices directly from frozen.
Why This Bread Changed My Baking Life
I learned how to make this bread that rises a lot and is very fluffy, and it opened up a whole new world in my kitchen. There’s something deeply satisfying about pulling a perfect loaf from the oven—the golden crust, the tender crumb, the incredible aroma filling your home.
Beyond the satisfaction, there’s the practical benefit. Homemade bread costs a fraction of bakery bread and contains no preservatives or mystery ingredients. You know exactly what’s going into your body.
But most importantly, bread baking connects you to thousands of years of human tradition. Every time you knead dough and watch it rise, you’re participating in one of civilization’s oldest crafts.
Your Journey to Perfect Bread Starts Now
The techniques I’ve shared aren’t difficult—they just require attention to detail and a bit of patience. Your first loaf might not be perfect, and that’s okay. Each time you bake, you’ll understand the dough better, develop a feel for when it’s kneaded enough, and recognize when it’s perfectly risen.
Start with this recipe exactly as written. Once you’ve made it successfully two or three times, you’ll have the confidence to experiment with additions and variations.
The bread that rises a lot and turns out very fluffy isn’t the result of magic or special talent. It’s simply the result of understanding a few key principles and applying them consistently.
So clear some counter space, set aside an afternoon, and give this recipe a try. I promise you, the moment you slice into that first loaf and see the soft, fluffy interior studded with perfect air pockets, you’ll be hooked on bread baking for life.
Your kitchen is about to smell amazing. Let’s get baking!
