.
Understanding Why Pots Develop Black Stains on the Outside
Before diving into cleaning methods, it helps to understand what causes those unsightly black marks on your cookware. The dark stains and burn marks on the exterior of pots typically result from several factors working together over time.
Table of Contents
The Science Behind Burnt-On Residue
When you cook, oils, food particles, and moisture splatter onto the pot’s exterior surface. The high heat from your stovetop causes these substances to carbonize, creating a hard, blackened layer that ordinary dish soap can’t penetrate. This process intensifies with repeated use, especially if spills aren’t wiped away immediately.
Gas stoves contribute additional carbon deposits from the flame itself, while electric burners create heat patterns that bake grime onto the bottom of pots. Over months and years, these layers accumulate, transforming shiny cookware into dull, stained pieces that look beyond repair.
Essential Supplies You’ll Need
Gathering the right materials before you start makes the cleaning process much more efficient. Most of these items are probably already in your kitchen or pantry.
Basic Cleaning Arsenal
- Baking soda (sodium bicarbonate)
- White distilled vinegar
- Dish soap (preferably a grease-cutting formula)
- Coarse salt
- Cream of tartar
- Lemon juice or fresh lemons
- Bar Keeper’s Friend (optional but highly effective)
- Soft sponges and scrub brushes
- Steel wool or copper scrubbers (for certain materials only)
- Microfiber cloths
- Large basin or sink
- Hot water
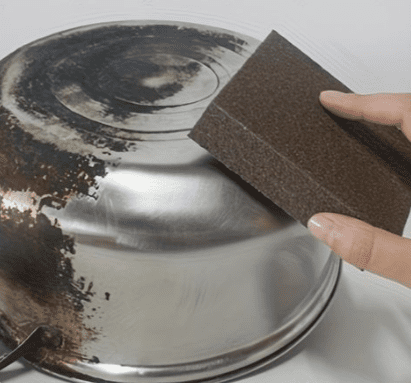
Method 1: The Baking Soda and Vinegar Powerhouse
This combination creates a chemical reaction that breaks down burnt residue effectively while remaining gentle on most cookware surfaces.
Step-by-Step Process
Start by creating a thick paste using three parts baking soda to one part water. The consistency should resemble toothpaste—thick enough to cling to vertical surfaces without dripping.
Apply this paste generously to all blackened areas on the pot’s exterior. Don’t be stingy; a good coating ensures better results. Let the paste sit for at least 15 minutes, though stubborn stains benefit from 30 minutes or longer.
Next, spray white vinegar directly onto the baking soda paste. You’ll see immediate fizzing as the acid and base interact. This bubbling action lifts grime from the pot’s surface. Let this reaction work for another 10 minutes.
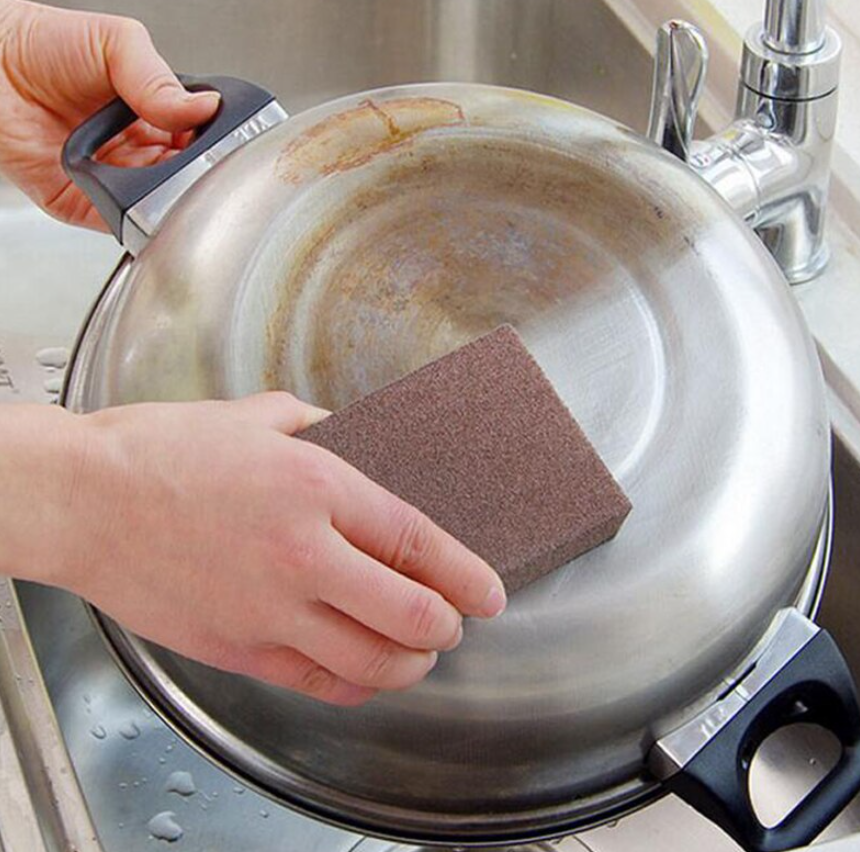
Using a non-abrasive sponge or soft brush, scrub the exterior in circular motions. The blackened residue should begin loosening immediately. For particularly stubborn spots, add a pinch of coarse salt to your sponge for gentle abrasive action.
Rinse thoroughly with hot water and dry with a clean cloth. If some discoloration remains, repeat the process. Most pots need two to three treatments for complete restoration.
Method 2: The Boiling Water Soak Technique
This method works exceptionally well for pots with heavy buildup on the bottom and lower sides.
How to Execute This Method
Fill your sink or a large basin with extremely hot water—as hot as your tap produces. Add half a cup of baking soda and a quarter cup of dish soap. Stir until dissolved.
Submerge the entire pot, ensuring the stained exterior surfaces remain completely underwater. Let it soak for one to two hours. The combination of heat and alkaline solution softens even the most stubborn carbonized deposits.
After soaking, the blackened areas should feel slippery rather than crusty. Use a scrubbing pad to wipe away the loosened grime. Most residue will come off with minimal effort at this point.
For burn marks that remain, make a fresh baking soda paste and apply directly to those spots. Scrub with moderate pressure using a brush or sponge designed for your pot’s material.
Method 3: Lemon and Salt Natural Scrub
This method leverages natural acidity and abrasive action without harsh chemicals, making it perfect for those seeking eco-friendly solutions.
Application Instructions
Cut a fresh lemon in half and dip the cut surface into coarse salt. The salt crystals adhere to the juicy lemon, creating a natural scrubbing tool.
Rub the salted lemon directly onto the blackened exterior of your pot. Apply firm pressure and work in circular patterns. The citric acid breaks down oxidation and burnt residue while the salt provides gentle abrasive action.
Continue rubbing until you’ve covered all stained areas. Squeeze the lemon occasionally to release more juice. You may need two or three lemons for heavily soiled pots.
Let the lemon juice sit on the surface for 10 minutes before scrubbing with a sponge and rinsing. The combination of acid and salt typically removes moderate staining in one application.
Method 4: Cream of Tartar Solution
This lesser-known method proves remarkably effective on stainless steel and aluminum cookware.
Creating and Using the Solution
Mix cream of tartar with white vinegar to form a runny paste. The ratio should be roughly two tablespoons of cream of tartar per quarter cup of vinegar.
Paint this mixture onto the stained exterior using a pastry brush or sponge. Ensure complete coverage of all discolored areas. The tartaric acid in cream of tartar excels at breaking down heat-related discoloration.
Allow the solution to work for 20 to 30 minutes. During this time, the paste may dry slightly, which is perfectly normal.
Scrub with a soft brush or sponge, adding small amounts of water if needed to reactivate the paste. The black stains should lift away with moderate scrubbing effort.
Rinse completely and buff dry with a soft cloth. This method often restores the original metallic shine to stainless steel pots.
Method 5: Bar Keeper’s Friend for Tough Jobs
When home remedies fall short, Bar Keeper’s Friend offers professional-grade cleaning power specifically formulated for cookware.
Proper Usage Guidelines
Wet the exterior of your pot with water. Sprinkle Bar Keeper’s Friend powder directly onto the blackened areas, or create a paste by mixing the powder with a small amount of water.
Using a damp sponge or cloth, scrub the product into the stained surface. Work in the direction of the metal’s grain if visible. Bar Keeper’s Friend contains oxalic acid, which dissolves rust, tarnish, and burnt-on residue effectively.
Let it sit for one minute maximum—leaving it longer can damage certain finishes. Never let this product dry on your cookware.
Scrub thoroughly, then rinse immediately and completely. Bar Keeper’s Friend requires thorough removal to prevent potential surface damage. Dry with a clean towel.
This product works wonders on stainless steel but requires caution with aluminum or non-stick exteriors. Always test on a small, inconspicuous area first.
Material-Specific Cleaning Considerations
Different pot materials require tailored approaches to avoid damage while achieving optimal results.
Stainless Steel Pots
Stainless steel tolerates most cleaning methods well. You can safely use baking soda, vinegar, Bar Keeper’s Friend, and even gentle abrasive scrubbers. Avoid chlorine bleach, which can cause pitting and discoloration.
For rainbow-colored heat stains on stainless steel, diluted vinegar works exceptionally well. Apply, let sit briefly, then wipe clean.
Aluminum Cookware
Aluminum requires gentler treatment as it’s more reactive and prone to scratching. Stick with baking soda paste and avoid highly acidic solutions like straight vinegar or lemon juice, which can cause discoloration.
Never use steel wool on aluminum—it leaves scratches that accumulate grime. Opt for softer scrubbing pads instead.
Copper-Bottom Pots
The copper layer on pot bottoms requires special attention. Mix equal parts flour, salt, and vinegar to create a paste specifically for copper. Apply, let sit for an hour, then scrub and rinse. This combination removes tarnish beautifully while preserving the copper’s integrity.
Cast Iron Exteriors
Cast iron pots with enamel exteriors clean well with baking soda methods. However, bare cast iron exteriors benefit from oil-based cleaning. After removing debris, apply a thin layer of vegetable oil to prevent rust.
Preventing Future Black Stains and Burn Marks
Prevention proves far easier than removal when it comes to pot exterior maintenance.
Daily Maintenance Habits
Wipe pot exteriors immediately after cooking while they’re still warm but not hot. A simple wipe with a damp cloth removes fresh splatters before they carbonize.
Adjust your burner size to match your pot’s bottom. Flames or heating elements that extend beyond the pot’s base create unnecessary exterior burning and staining.
Regular Deep Cleaning Schedule
Even with careful use, pots benefit from monthly deep cleaning sessions. Address minor discoloration before it becomes major buildup requiring aggressive scrubbing.
Consider dedicating one afternoon per month to cookware maintenance. This regular attention keeps your pots looking newer longer and makes each cleaning session significantly easier.
Storage Tips
Store pots with adequate spacing to prevent scratching and allow air circulation. Moisture trapped between stacked pots accelerates oxidation and staining.
Place paper towels or cloth pot protectors between stacked cookware to prevent damage and moisture accumulation.
Common Mistakes to Avoid
Understanding what not to do prevents damage and disappointment during the cleaning process.
Using Abrasives on Wrong Surfaces
Steel wool and harsh scrubbing pads scratch softer metals like aluminum and copper. These scratches trap food particles and create permanent dullness. Match your scrubbing tool’s abrasiveness to your pot’s material hardness.
Mixing Incompatible Cleaners
Never mix bleach with vinegar or ammonia-based cleaners. These combinations create toxic fumes that pose serious health risks. Stick with one cleaning method at a time, rinsing completely before trying another approach.
Ignoring Manufacturer Instructions
Some pots feature special coatings or finishes with specific care requirements. Always consult care instructions before attempting aggressive cleaning methods. What works for standard stainless steel might damage specialty finishes.
Expecting Instant Results
Severe staining accumulated over years won’t disappear in minutes. Patience and persistence win the battle against burnt-on grime. Multiple applications of cleaning solutions often prove necessary for complete restoration.
When Professional Cleaning Makes Sense
Sometimes, despite best efforts, cookware reaches a point where professional restoration becomes the practical choice.
Assessing Beyond-Repair Damage
If scrubbing exposes pitting, warping, or metal degradation beneath the stains, the pot may have structural damage. Deep corrosion compromises cooking performance and safety.
Extremely expensive or sentimental cookware pieces justify professional restoration services. Specialists possess industrial-strength cleaning solutions and equipment unavailable to home cooks.
Cost-Benefit Analysis
Compare the time investment and product costs for DIY cleaning against the pot’s replacement cost. Inexpensive pots showing severe damage might warrant replacement rather than extensive restoration efforts.
However, quality cookware deserves preservation attempts. A twenty-dollar investment in cleaning supplies can restore a hundred-dollar pot to like-new condition.
Eco-Friendly and Non-Toxic Alternatives
For households avoiding commercial cleaners, natural alternatives provide effective cleaning power without environmental concerns.
Plant-Based Dish Soap Enhancement
Modern plant-based dish soaps cut grease surprisingly well. Combine with baking soda for a completely non-toxic cleaning system suitable for sensitive individuals or homes with small children.
Vinegar and Essential Oils
Add a few drops of tea tree or eucalyptus essential oil to your vinegar cleaning solution. These oils provide additional antibacterial properties and leave a pleasant scent, masking vinegar’s sharp odor.
Hydrogen Peroxide Option
Three-percent hydrogen peroxide mixed with baking soda creates a gentle yet effective paste for stubborn stains. This combination works through oxidation rather than harsh chemicals, making it safe for all cookware types.
Restoring Shine After Removing Stains
Once you’ve eliminated black stains, a few finishing touches restore your pot’s original luster.
Polishing Techniques
For stainless steel, olive oil applied with a soft cloth creates beautiful shine. Use small amounts and buff thoroughly to prevent sticky residue.
Aluminum pots benefit from a final rinse with diluted lemon juice, followed by immediate drying. This removes any water spots and enhances natural shine.
Final Buffing
Always finish your cleaning session with complete drying using microfiber cloths. Water spots and mineral deposits from air-drying undo your hard work and create new discoloration.
Buff in circular motions until the surface gleams. This final step takes just minutes but dramatically improves your pot’s appearance.
Conclusion
Learning the correct way to clean the pot from the outside and remove black stains transforms frustrating cookware eyesores into sparkling kitchen tools. Whether you choose baking soda and vinegar, lemon and salt, or specialized products like Bar Keeper’s Friend, consistent application of proper techniques yields impressive results.
Remember that different materials require different approaches, and patience outperforms aggressive scrubbing every time. Regular maintenance prevents severe buildup, making future cleaning sessions quick and effortless.
Your pots endure intense heat and constant use, so they deserve proper care. With these proven methods, even the most stained, burnt, and discolored cookware can regain its original beauty. Start with the gentlest method appropriate for your pot’s material, and escalate to stronger solutions only if needed.
Clean cookware doesn’t just look better—it performs better too. Heat distributes more evenly across clean surfaces, and you’ll take more pride in your kitchen when your pots shine. Implement these techniques today and enjoy cookware that looks as good as it cooks.
