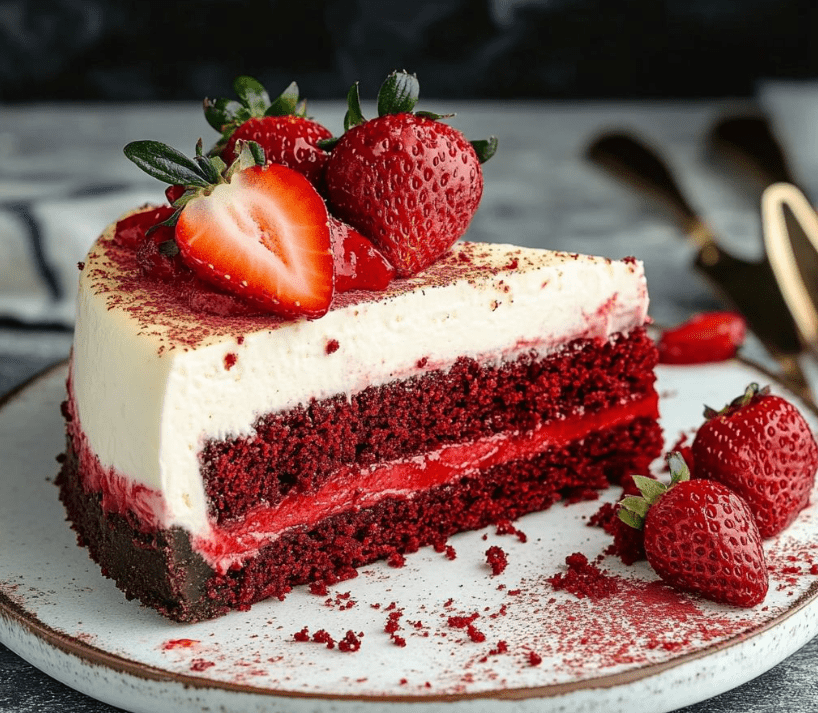
There’s something absolutely magical about the moment you slice into a perfectly crafted Red Velvet Cheesecake and see those gorgeous crimson layers contrasting against the creamy white filling. This show-stopping dessert combines the beloved flavors of classic red velvet cake with the luxurious richness of New York-style cheesecake, creating a dessert that’s both visually stunning and incredibly delicious.
Red velvet cake has its roots in the American South, where it became a symbol of elegance and celebration during the early 20th century. By marrying this iconic flavor profile with the timeless appeal of cheesecake, we’ve created a dessert that’s perfect for anniversaries, birthdays, Valentine’s Day, or any occasion that calls for something truly special. Whether you’re an experienced baker or someone who loves to experiment in the kitchen, this Red Velvet Cheesecake will become your new signature dessert that guests will be talking about for weeks.
Table of Contents
Ingredients List
For the Red Velvet Crust:
• 2 cups graham cracker crumbs • 1/4 cup unsweetened cocoa powder • 1/3 cup granulated sugar • 6 tablespoons unsalted butter, melted • 1 teaspoon vanilla extract
For the Red Velvet Cheesecake Filling :
• 32 oz (4 packages) cream cheese, softened to room temperature • 1 cup granulated sugar • 4 large eggs, room temperature • 1/2 cup sour cream • 1/4 cup heavy cream • 2 tablespoons all-purpose flour • 2 tablespoons unsweetened cocoa powder • 2 tablespoons red food coloring (gel preferred) • 2 teaspoons vanilla extract • 1 teaspoon white vinegar • 1/4 teaspoon salt
For the Cream Cheese Frosting:
• 8 oz cream cheese, softened • 1/2 cup unsalted butter, softened • 3 cups powdered sugar • 1 teaspoon vanilla extract • 2-3 tablespoons heavy cream
Substitution Notes: You can substitute Greek yogurt for sour cream, or use natural food coloring made from beet juice for a more natural approach. For a lighter version, use reduced-fat cream cheese, though the texture will be slightly less rich.
Step-by-Step Instructions
Preparing Your Kitchen and Pan
- Set up your workspace by preheating your oven to 325°F (163°C). Wrap the outside of a 9-inch springform pan with heavy-duty aluminum foil to prevent water from seeping in during the water bath process. This step is crucial for achieving that perfectly smooth, crack-free surface.
- Create the perfect crust by combining graham cracker crumbs, cocoa powder, and sugar in a medium bowl. Pour in the melted butter and vanilla, then mix until the mixture resembles wet sand and holds together when pressed. Press this mixture firmly into the bottom of your prepared springform pan, creating an even layer. Use the bottom of a measuring cup to ensure it’s perfectly compact.
Making the Red Velvet Filling
- Begin your filling by beating the softened cream cheese in a large bowl with an electric mixer on medium speed for 3-4 minutes until it’s completely smooth and fluffy. This step is essential – any lumps in your cream cheese will create a grainy texture in your finished cheesecake.
- Add the sugar gradually while continuing to beat the mixture. Once incorporated, add eggs one at a time, beating well after each addition. Make sure each egg is fully incorporated before adding the next one to prevent overmixing.
- Incorporate the wet ingredients by mixing in the sour cream, heavy cream, vanilla extract, and white vinegar. The vinegar helps create that subtle tang that’s characteristic of red velvet flavor.
- Create the red velvet magic by whisking together the flour, cocoa powder, and salt in a separate small bowl. Gradually add this dry mixture to your cream cheese base, mixing on low speed until just combined. Finally, add the red food coloring and mix until you achieve that signature deep red color.
Baking Process
- Pour and prepare for baking by transferring your filling into the prepared crust. Gently tap the pan on the counter to release any air bubbles. Place the springform pan inside a larger roasting pan and carefully pour hot water into the roasting pan until it reaches halfway up the sides of the springform pan.
- Bake to perfection for 55-65 minutes, or until the center is almost set but still slightly jiggly when you gently shake the pan. The edges should be set and lightly golden. Turn off the oven and crack the door open, allowing the cheesecake to cool gradually for 1 hour.
- Complete the cooling process by removing the cheesecake from the water bath and running a knife around the edges to prevent cracking. Let it cool completely at room temperature for 2 hours, then refrigerate for at least 6 hours or overnight.
Finishing Touches
- Prepare the cream cheese frosting by beating together the softened cream cheese and butter until light and fluffy. Gradually add the powdered sugar, vanilla, and enough heavy cream to achieve a smooth, pipeable consistency.
- Decorate your masterpiece by spreading or piping the frosting on top of your chilled cheesecake. You can create beautiful swirls, rosettes, or simply spread it smooth for an elegant finish.
Pro Tips & Variations
Temperature is everything – ensure all your ingredients are at room temperature before starting. Cold ingredients don’t blend well and can create lumps in your cheesecake. Take your cream cheese and eggs out of the refrigerator at least 2 hours before baking.
For chocolate lovers, try adding 1/2 cup of mini chocolate chips to the filling for extra texture and flavor. You can also drizzle melted chocolate over the finished cheesecake for an even more decadent presentation.
Make it lighter by substituting half the cream cheese with Greek yogurt and using sugar substitute. While the texture will be slightly different, you’ll still get that amazing red velvet flavor with fewer calories.
Flavor variations include adding a tablespoon of espresso powder to enhance the chocolate notes, or incorporating cream cheese frosting between layers if you want to create a layered effect.
Professional presentation tip: Use a warm, clean knife to slice your cheesecake, wiping it clean between each cut. This ensures clean, beautiful slices that showcase those stunning red layers.
Storage & Reheating Tips
Your Red Velvet Cheesecake will stay fresh in the refrigerator for up to 5 days when covered with plastic wrap or stored in an airtight container. The flavors actually improve after the first day as they have time to meld together.
For longer storage, you can freeze individual slices wrapped tightly in plastic wrap and then aluminum foil for up to 3 months. When you’re ready to enjoy, simply thaw the slice in the refrigerator overnight. The texture remains remarkably close to fresh.
Unlike many desserts, cheesecake is best served chilled, so there’s no need for reheating. In fact, attempting to warm it will compromise the texture. If you prefer it slightly less cold, simply let it sit at room temperature for 10-15 minutes before serving.
Frequently Asked Questions
Can I make this Red Velvet Cheesecake ahead of time?
Absolutely! This cheesecake actually tastes better when made 1-2 days in advance. The flavors have time to develop and meld together, creating an even more delicious dessert. Just add the cream cheese frosting right before serving for the best presentation.
What can I use instead of red food coloring?
If you prefer natural alternatives, you can use beet juice or natural red food coloring, though the color won’t be quite as vibrant. You’ll need about 3-4 tablespoons of beet juice to achieve a nice red tint. Some bakers also use freeze-dried strawberry powder for a natural pink hue.
Why did my cheesecake crack on top?
Cracks usually occur from sudden temperature changes or overbaking. Using a water bath, gradual cooling, and not overbaking are your best defenses. If your cheesecake does crack, don’t worry – the cream cheese frosting will cover any imperfections beautifully.
Can I freeze this cheesecake?
Yes! Wrap the unfrosted cheesecake tightly in plastic wrap, then aluminum foil. It freezes well for up to 3 months. Thaw overnight in the refrigerator before adding frosting and serving.
How do I know when my cheesecake is done?
The perfect cheesecake should be set around the edges but still have a slight jiggle in the center when you gently shake the pan. It will continue to set as it cools, so don’t overbake it trying to eliminate all movement.
Nutritional Information
Per slice (assuming 12 servings):
- Calories: approximately 485
- Fat: 35g
- Carbohydrates: 38g
- Protein: 8g
- Sugar: 32g
- Fiber: 1g
Note: Nutritional values are approximate and may vary based on specific ingredients used and portion sizes.
Recipe Card
Red Velvet Cheesecake
Prep Time: 25 minutes
Cook Time: 65 minutes
Cooling Time: 8 hours
Total Time: 9 hours 30 minutes
Servings: 12 slices
Ingredients:
Crust: • 2 cups graham cracker crumbs • 1/4 cup unsweetened cocoa powder • 1/3 cup granulated sugar • 6 tablespoons unsalted butter, melted • 1 teaspoon vanilla extract
Filling: • 32 oz cream cheese, softened • 1 cup granulated sugar • 4 large eggs, room temperature • 1/2 cup sour cream • 1/4 cup heavy cream • 2 tablespoons all-purpose flour • 2 tablespoons unsweetened cocoa powder • 2 tablespoons red food coloring • 2 teaspoons vanilla extract • 1 teaspoon white vinegar • 1/4 teaspoon salt
Frosting: • 8 oz cream cheese, softened • 1/2 cup unsalted butter, softened • 3 cups powdered sugar • 1 teaspoon vanilla extract • 2-3 tablespoons heavy cream
Instructions:
- Preheat oven to 325°F. Wrap springform pan with foil.
- Mix crust ingredients and press into pan bottom.
- Beat cream cheese until smooth, add sugar gradually.
- Add eggs one at a time, then sour cream, heavy cream, vanilla, and vinegar.
- Whisk together flour, cocoa, and salt. Add to cream cheese mixture.
- Mix in red food coloring until evenly colored.
- Pour over crust and bake in water bath for 55-65 minutes.
- Cool gradually in oven, then at room temperature, then refrigerate 6+ hours.
- Top with cream cheese frosting before serving.
Notes:
• All ingredients should be at room temperature for best results • Water bath prevents cracking and ensures even baking • Cheesecake tastes best after chilling overnight • Store covered in refrigerator for up to 5 days
This Red Velvet Cheesecake represents the perfect marriage of two beloved desserts, creating something truly extraordinary that will elevate any gathering. The combination of that signature red velvet flavor with the creamy richness of cheesecake creates layers of taste and texture that are simply irresistible. Every bite delivers the perfect balance of tangy cream cheese, subtle chocolate notes, and that distinctive red velvet character that makes this dessert so special.
The beauty of this recipe lies not just in its incredible taste, but in its versatility and make-ahead convenience. You can prepare it days in advance, making it perfect for entertaining or special occasions when you want to spend more time with your guests and less time in the kitchen. The striking visual appeal ensures it will be the centerpiece of any dessert table, while the familiar yet elevated flavors guarantee it will satisfy dessert lovers of all ages.
If you enjoyed this recipe, please share it with friends and family, and let us know your thoughts in the comments — we love hearing your cooking stories and tips!
Tags: Red Velvet Cheesecake