✨ The Magic Behind the Creaminess
The secret to this incredible texture lies in one specific ingredient: sweetened condensed milk.
Why Condensed Milk is the Key
- Low Freezing Point: Sweetened condensed milk is essentially milk with a high sugar concentration, which naturally lowers its freezing point. This prevents the formation of large, crystalized ice particles, resulting in a much smoother, softer texture right out of the freezer.
- Built-in Sweetness: It provides the perfect level of sweetness, eliminating the need to dissolve granulated sugar into a traditional custard base (which requires cooking!).
- Emulsification: Its thick, creamy structure helps stabilize the whipped cream, contributing to the impressive volume and yield of the final product.
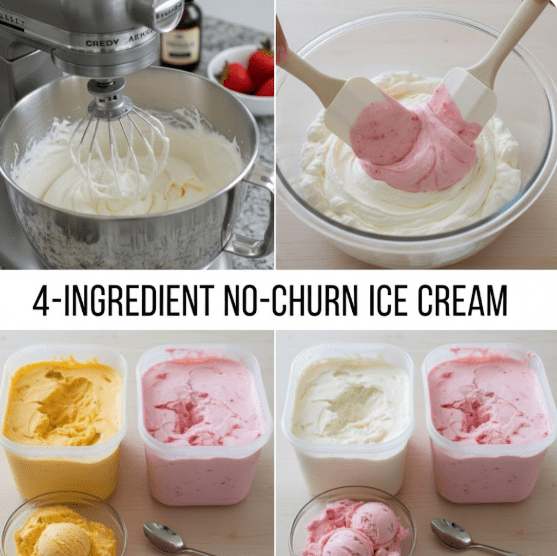
📝 The Four Simple Ingredients
You truly only need these four basic components to create the perfect creamy base.
- Heavy Whipping Cream (Cold): This is the foundation for volume and lightness. It must be very cold to whip properly.
- Sweetened Condensed Milk (Chilled): The essential ingredient for structure and sweetness.
- Pure Vanilla Extract: Used for the classic flavor base.
- Flavoring/Inclusions (e.g., Cocoa Powder, Fruit Purée): This is where you customize your batch!
🥄 Step-by-Step: Crafting Your Creamy Base
Making this ice cream is a two-step process: whipping the cream and folding in the condensed milk. That’s it!
Step 1: Whip the Cream to Perfection
- Equipment: You’ll need a large mixing bowl and an electric mixer (handheld or stand mixer).
- The Goal: Pour the cold heavy whipping cream into the bowl. Start mixing on low speed and gradually increase to high. Beat the cream until stiff peaks form. Stiff peaks mean that when you lift the whisk, the cream holds its shape straight up and doesn’t flop over. This aeration is what gives the ice cream its volume and light texture, ensuring it yields well.
Step 2: Incorporate the Sweetness
- Folding Technique: Gently pour the chilled sweetened condensed milk and vanilla extract into the whipped cream. Switch from the electric mixer to a large spatula or whisk.
- Crucial Tip: Use a folding motion—cutting down the middle and sweeping the mixture up from the bottom of the bowl—rather than stirring. This prevents deflating the air you just worked into the cream. Stop folding as soon as the mixture is uniform and streak-free. The mixture will be thick, mousse-like, and very creamy.
🍓 Customizing Your Flavors (The Best Part!)
This is where the magic really happens, as shown in the image where the base is being poured in white and pink variations! The vanilla base is your blank canvas.
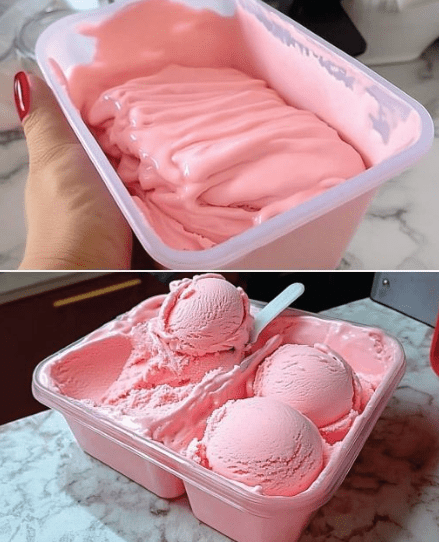
💖 Strawberry Swirl (Pink in the Image)
- Purée about 1 cup of fresh or frozen strawberries with a tablespoon of sugar.
- Gently swirl the purée into half of the finished cream base before transferring it to the container. The swirls create a beautiful color and intense fruit flavor.
💛 Mango/Passion Fruit (Orange/Yellow in the Image)
- Fold in $1/2$ cup of smooth, thick mango purée and/or the pulp of 3-4 passion fruits to half of the base. For an extra rich flavor, you can also fold in $1/4$ cup of crushed vanilla wafer cookies.
Other Popular Variations
- Chocolate: Sift $1/2$ cup of unsweetened cocoa powder into the condensed milk before folding it into the cream.
- Coffee: Dissolve 2 tablespoons of instant espresso powder in 1 tablespoon of hot water, let it cool completely, and then fold it into the base mixture.
- Cookies & Cream: Fold in $1$ cup of crushed chocolate sandwich cookies (like Oreos) at the end.
Step 3: Freeze and Enjoy
- Container: Transfer the mixture to a clean, freezer-safe container with an airtight lid (like the clear, rectangular containers in the image).
- Freezing: Place the container in the coldest part of your freezer (usually the back) for at least 6 to 8 hours, or overnight, until firm. Since the base is so creamy, it might require a few minutes at room temperature before being easily scoopable.
🌟 Pro Tips for the Best Results
- Chill Everything: Make sure your bowl, whisk attachments, heavy cream, and even the condensed milk are well-chilled. This maximizes the volume when whipping.
- Use Quality Ingredients: Because there are so few ingredients, the quality really shines through. Use the best vanilla extract you can afford.
- Air-Tight Seal: Always use an airtight container. Exposure to air is what causes freezer burn and that unpleasant icy layer.
This Easy Ice Cream Recipe proves that you don’t need fancy equipment to enjoy velvety, homemade ice cream. With just four ingredients and a few minutes of effort, you’ll have a dessert that is consistently very creamy and yields well, delighting everyone who tries it. Happy churning (or rather, non-churning)!
